
The five essential steps to making an online illustrated course
HOME - GUIDES - ONLINE ILLUSTRATION COURSE
Follow this step-by-step guide to discover the steps to designing an online course in illustration with CreativeMindClass, a free tool that is used by the top artists.
- Start creating your online illustration course
Making an online illustration course whether you're new to teaching or an expert, can be overwhelming. From concept, planning and production of videos to launch and beyond the many aspects to think about. The importance of having a plan in place is for success since it will help to organize all aspects, allowing you to focus on a unforgettable learning experience for your students.
In this guide, you'll learn the 5 crucial steps needed to create a successful online illustration course...
1. Online course planning Set up a place to make your own online course
2. The topic of your course: Determine your course's topic and the students you'll instruct.
3. The outline of the course Plan every course you'll need to take
4. Content delivery Create videos, downloadable files, and exercises
5. Website for your course Persuade your customers to purchase using text and visuals
1. Online course plan
Find a location to build your online course
Traditionally, an online course could be spread among social media sites, social networks, payment pages, messages emails, laptop folders. A central online course combines these into one place that is easy to access. It will evolve over the lifespan of your online course, but generally includes:
- Introduction
- Work Examples
- Materials
- Inspiration
- The Planning
- Class Project
- Summary
How do I get it within CreativeMindClass
- Click My Classin the main menu, to launch it.
- Click the ADD CLASS button to create a new course.
2. Course topic
Figure out what and who you'll be teaching.
Starting your online illustration class could be stressful since you must find something buyers will be drawn to. But a carefully thought subject matter will ensure that you are successful.
The course topic is an easy but impactful idea for creating an appropriate course that is targeted at the right people. Illustration is your forte; you have your knowledge as well as skills that people are willing to spend money on. It's time to look at it closer and put it into the words of others.
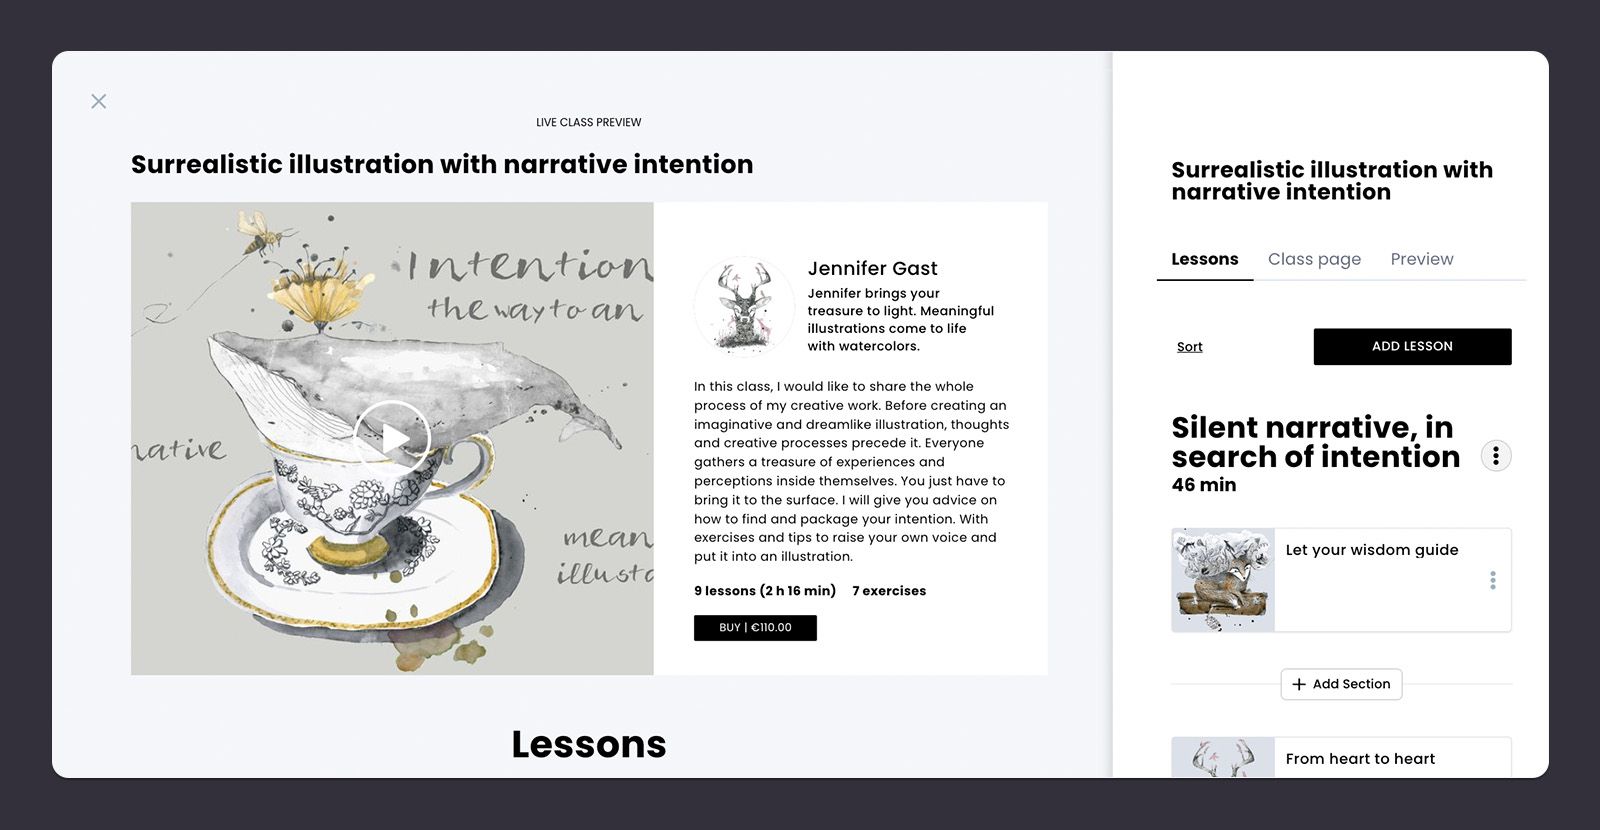
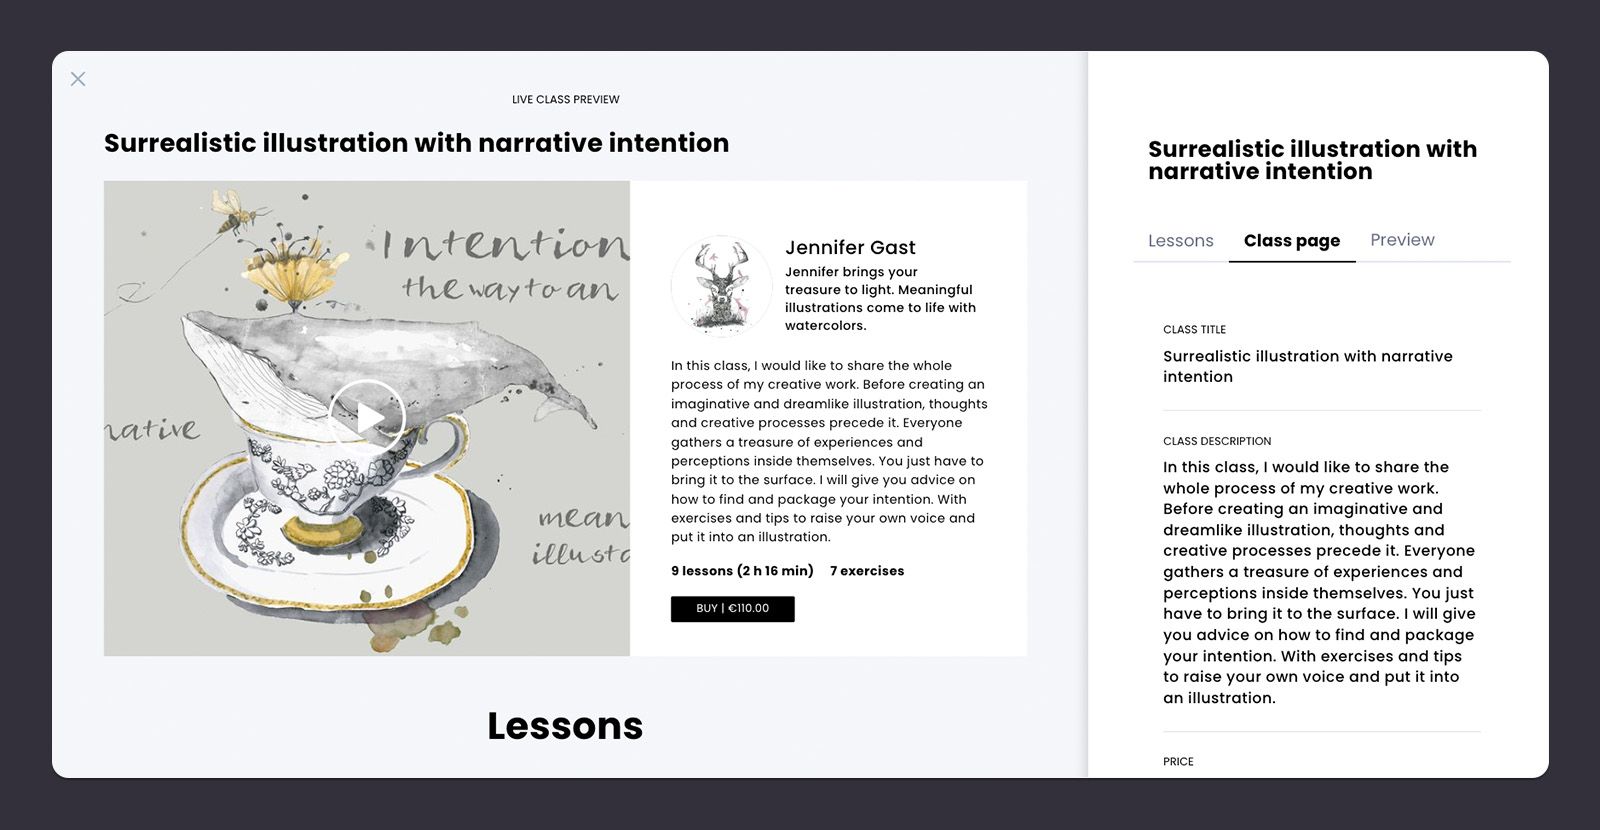
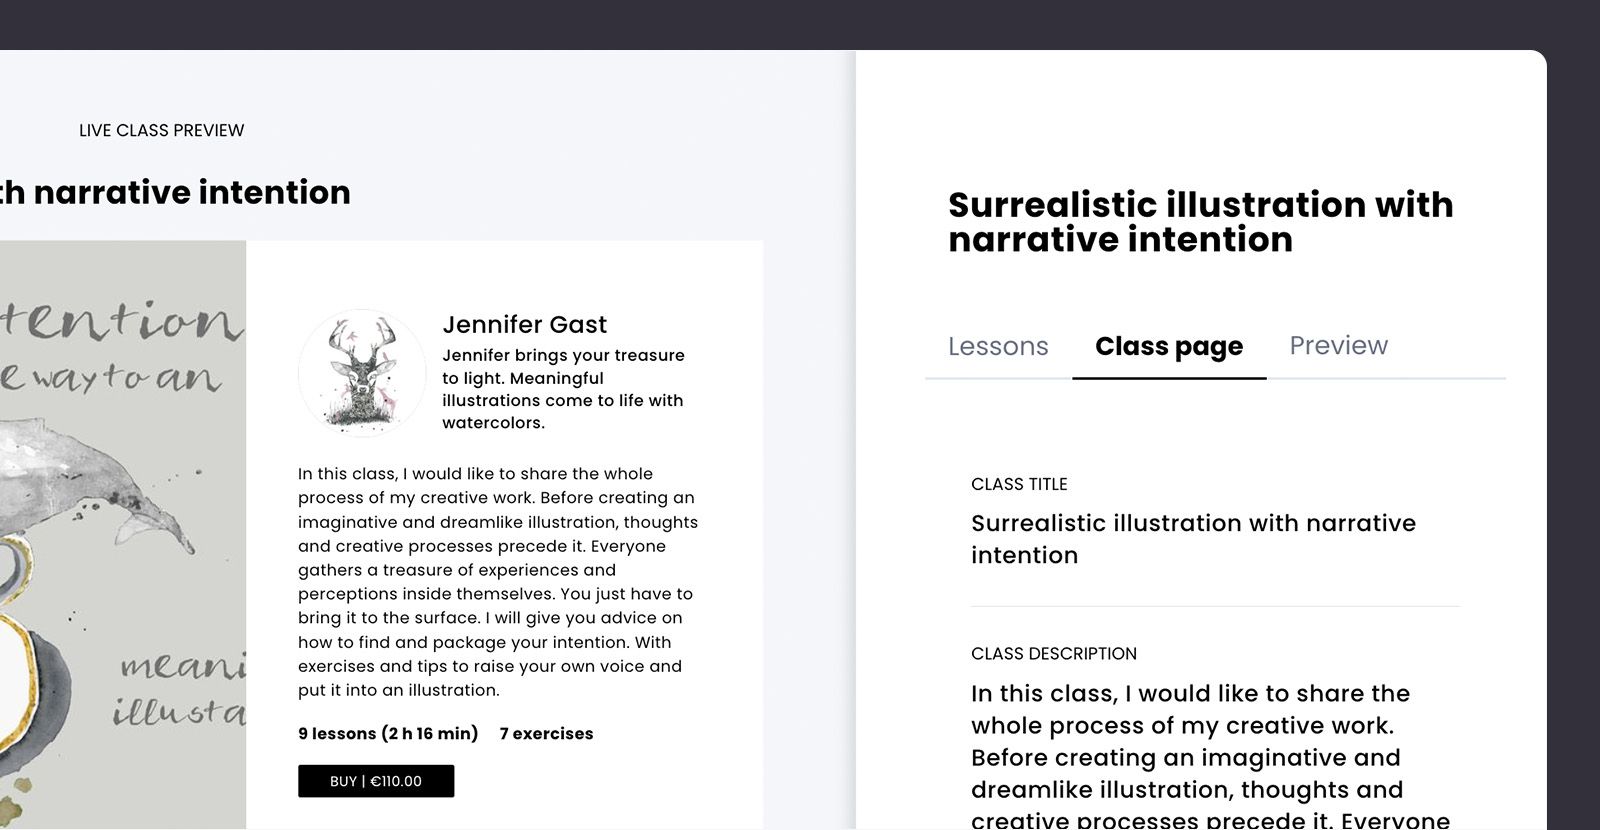
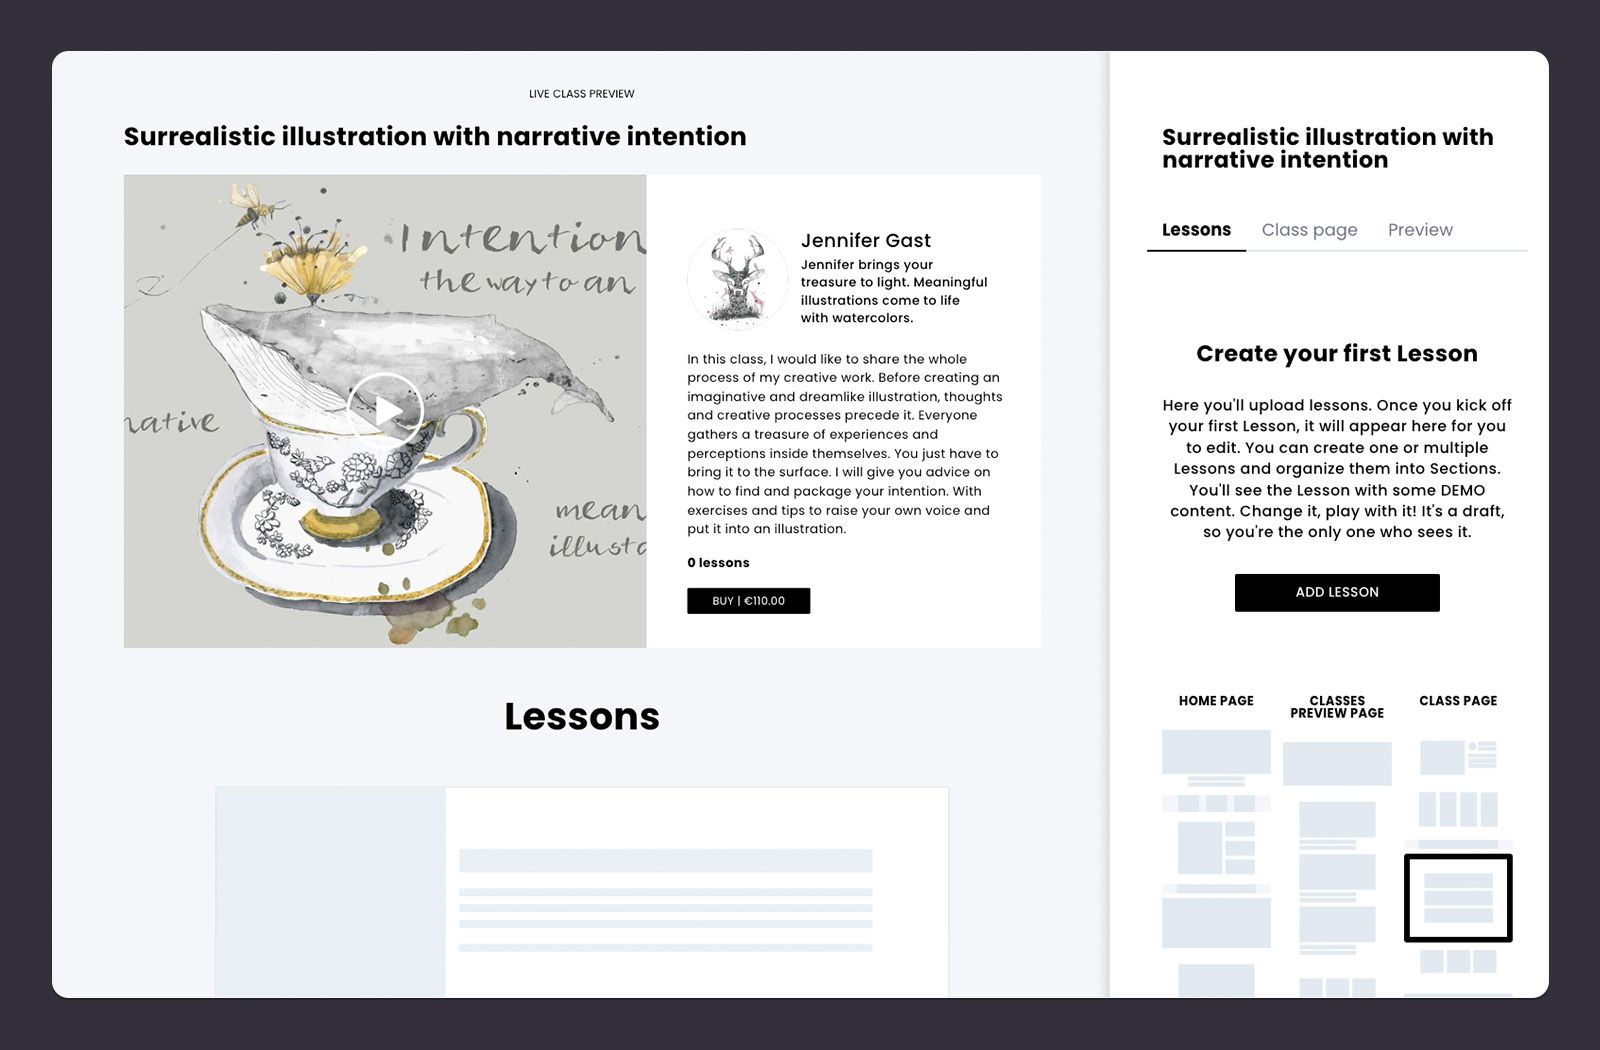
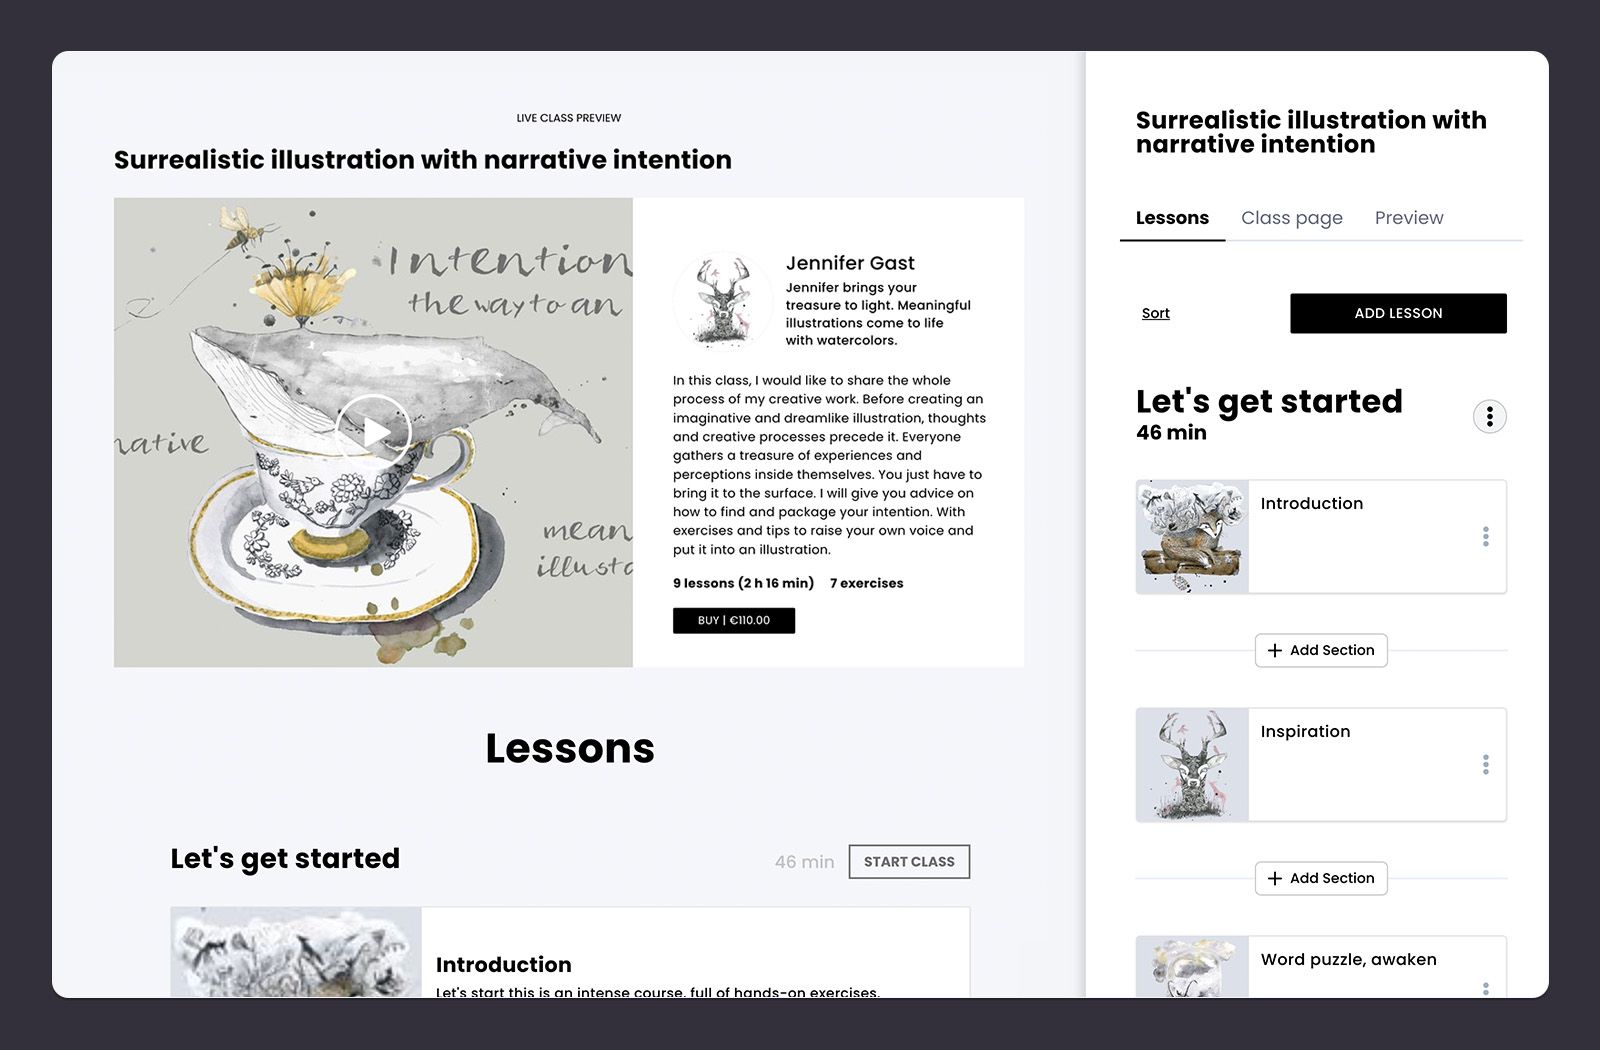
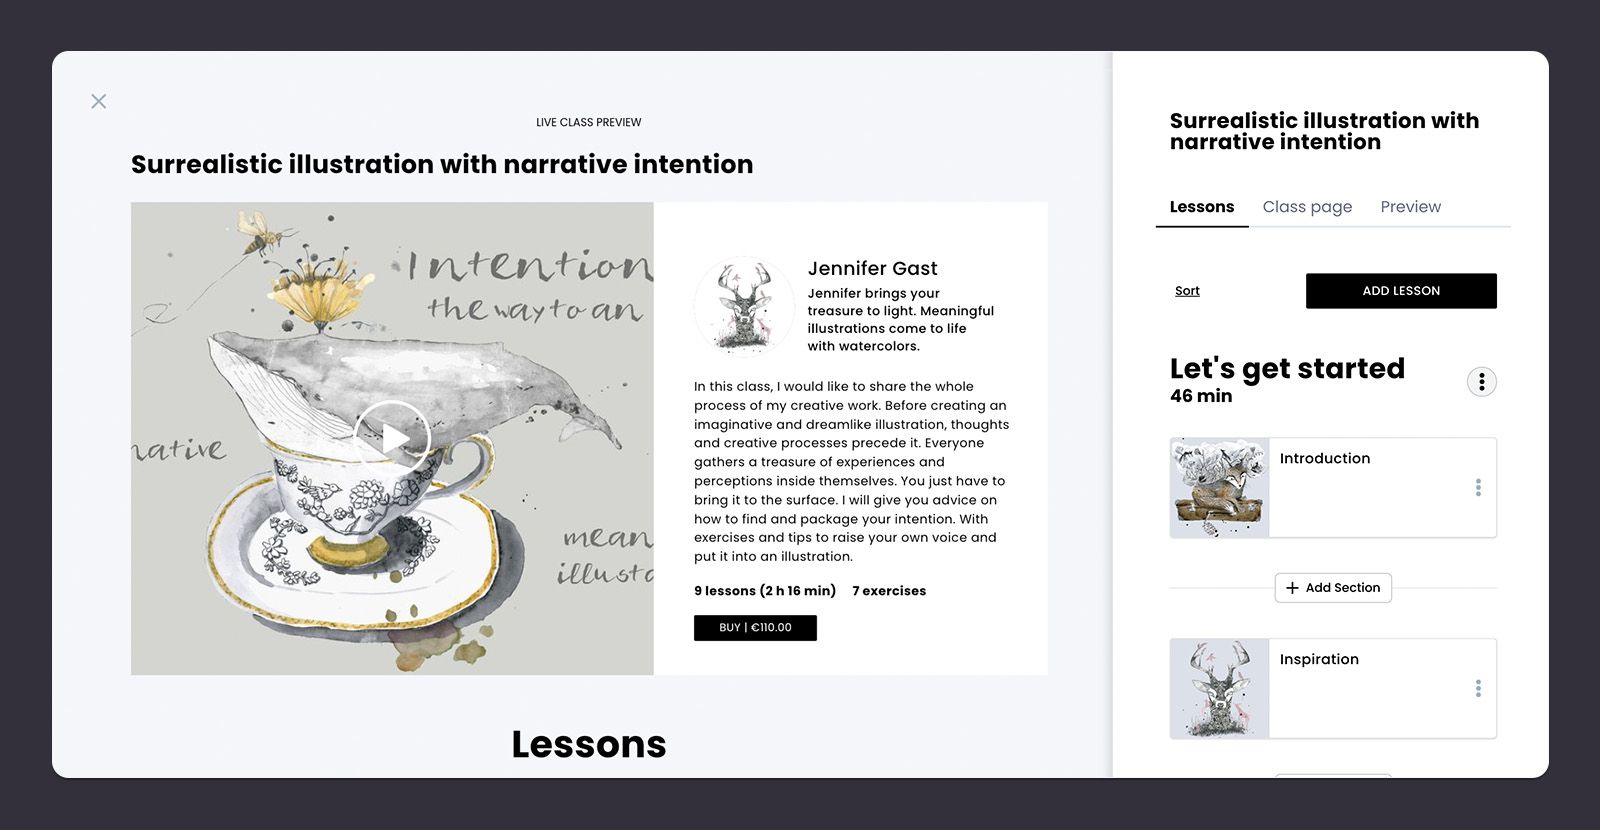
First, open the page for Class.
The Class page is a tab in the Class. Click the Class page tab to open it and start creating your course's name and description.
What is it? within CreativeMindClass
- Click the Class Page tab to open it.
Define what you will instruct
What sort of illustrations do you create? What is it that you enjoy most about it? What do others come to you for help with? What are you looking to know more about? This helps you to come up with a topic you feel most confident about which makes course development process much more simple.
Name your course
A clear, catchy, and benefit-focused title helps readers make a swift choice. It grabs interest and causes them to stop scrolling and say, "Yes, I want to buy it!". Utilize powerful words to stimulate emotions, and in turn the reaction which prompts them to look, read and purchase.
How to do it in CreativeMindClass
- Write the class titleto identify your course. As an example, you could say "Surrealistic illustration with the intention of telling a story".
Make an deal (and find people who will take it on)
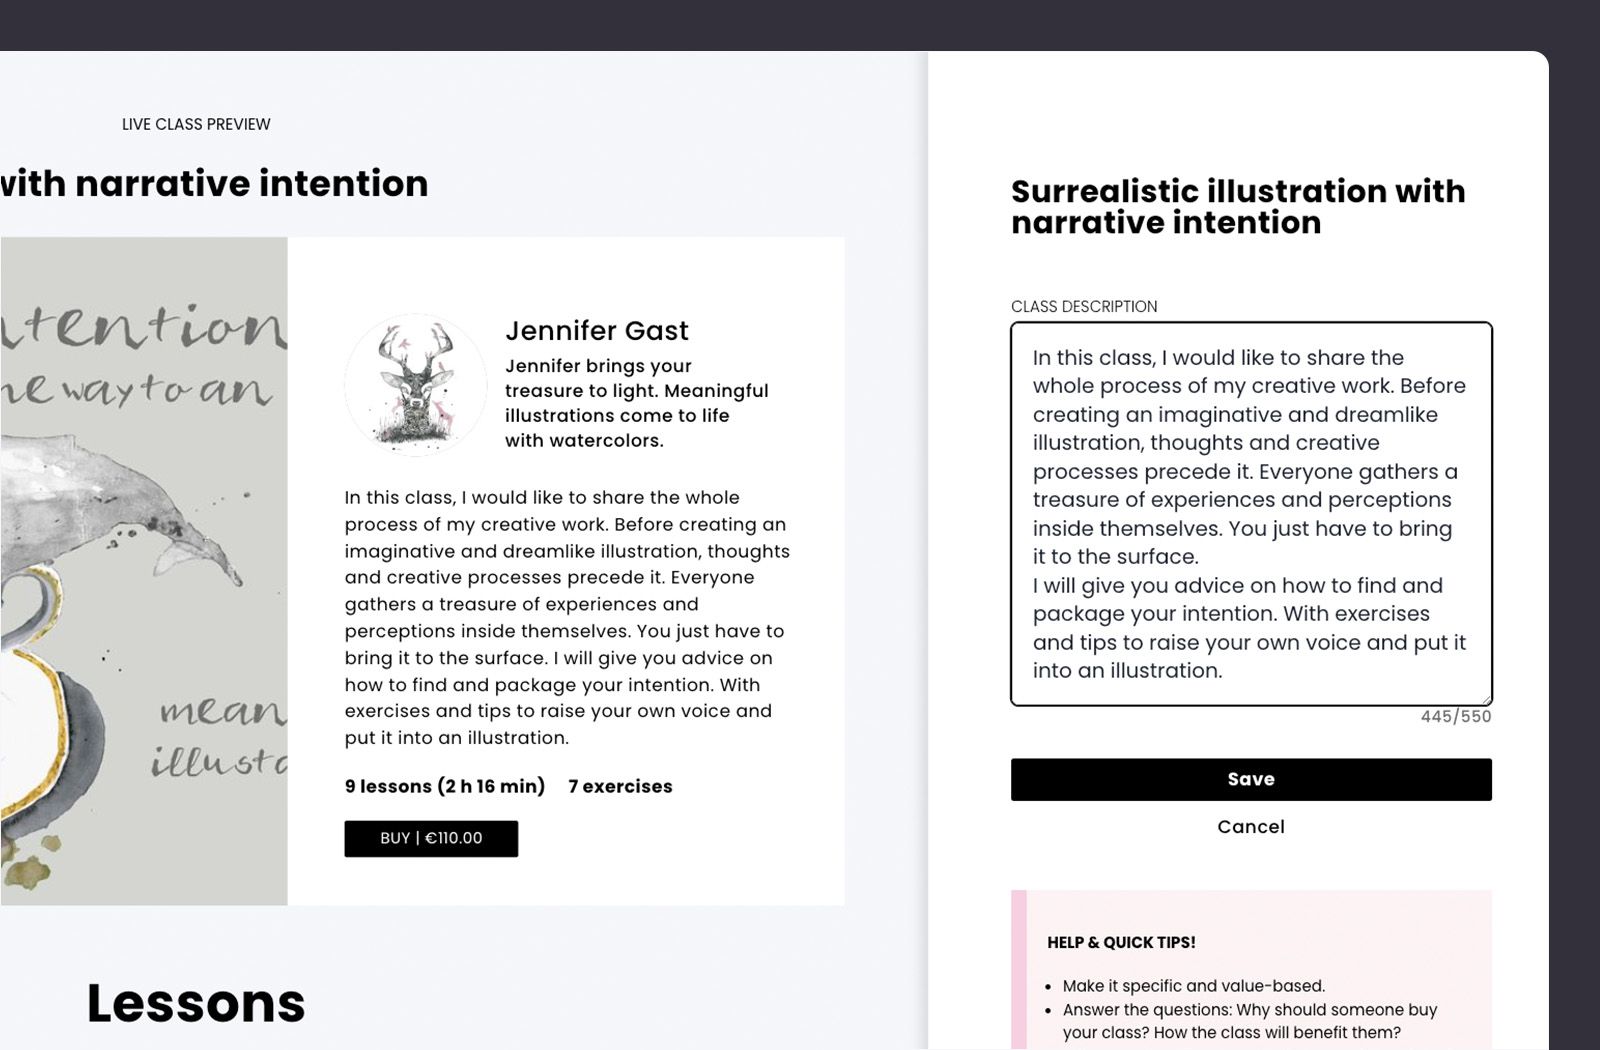
What will people be able to learn? Are you looking to concentrate on shooting or editing? Who is a promising audience to attend this class? What particular high-pain issues do you solve? Are there any competitors offering similar programs? When you're working on the proposal, locate someone who is interested enough to invest money in order to take the course.
How to do it in CreativeMindClass
- Use the form the class descriptionto communicate your offer in HTML1.your your.
The course is over. the topic!
When your subject has been completed, you can present a an effective and convincing idea for an Illustration online course. Make sure you create multiple classes to explore different course topics and test them.
The next step is to create a course plan so you don't get lost while recording the video...
3. The course outline
Create each lesson plan you'll need.
Making the decision to design an entire online illustration course may seem difficult. Simply navigating through the plethora of material can lead to confusion in selecting what should be part of the online course. A clearly-defined outline of the course will ensure that the course is manageable.
A course outline is a list of things to do of every video you want to record at the time of filming your course. The outline usually includes a listing of specific lessons with notes about content details and learning outcomes, so you don't forget a thing.
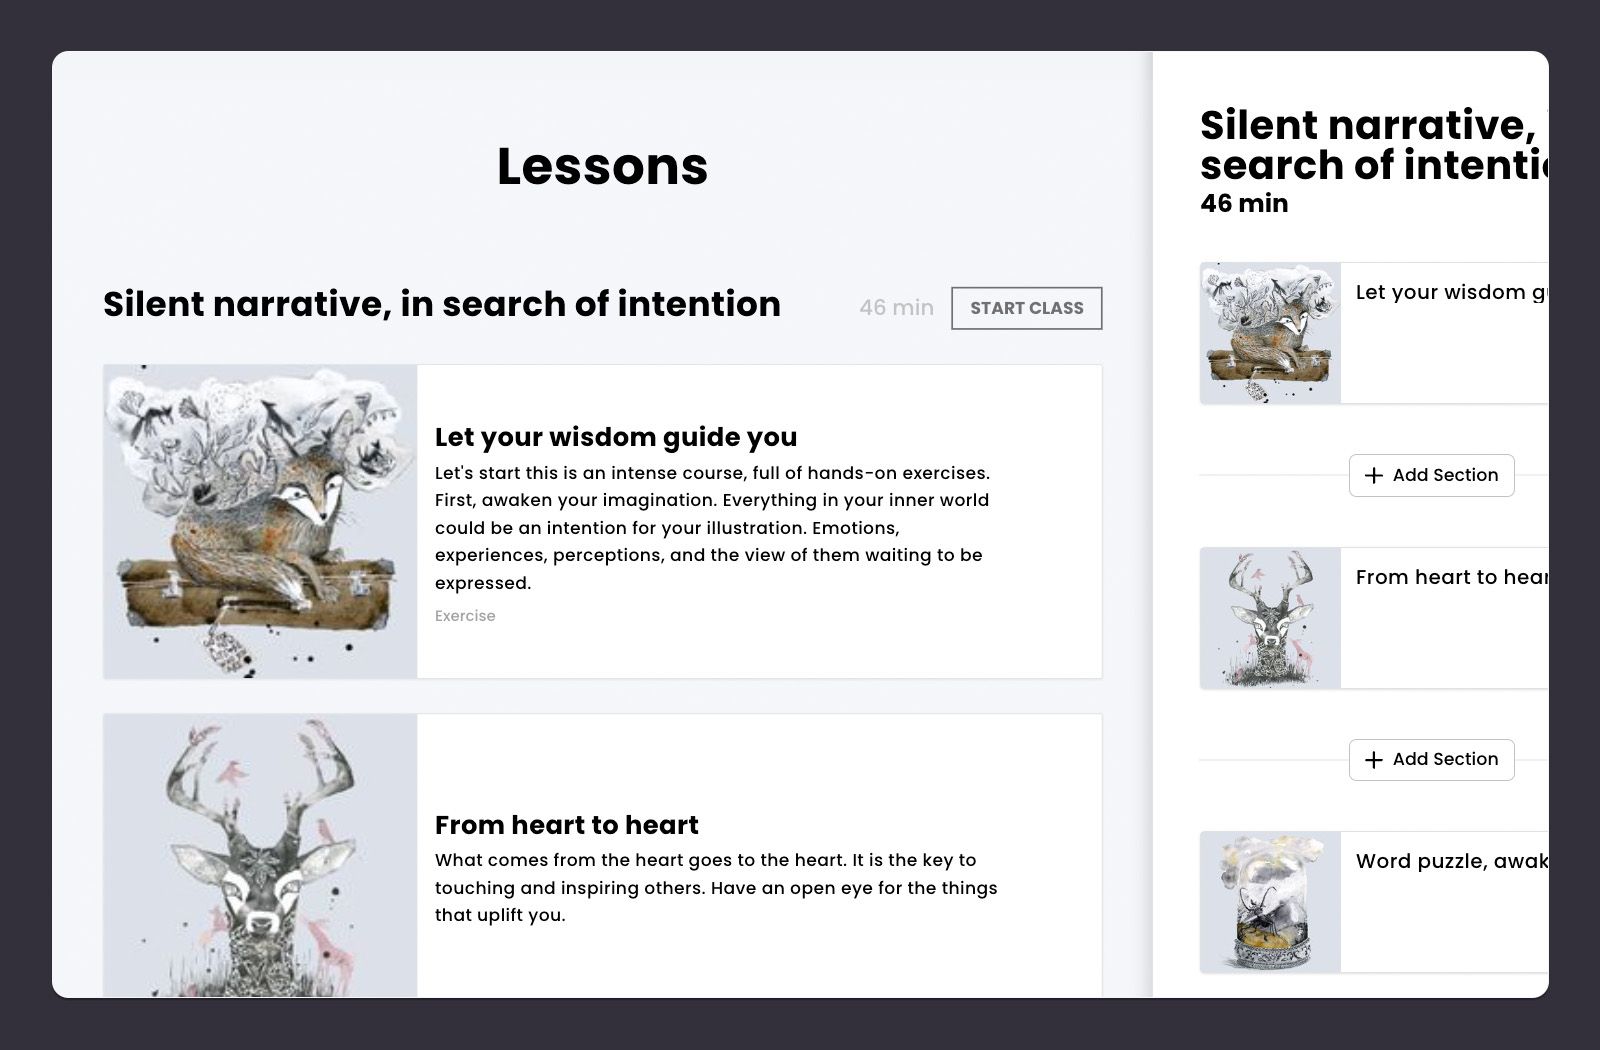
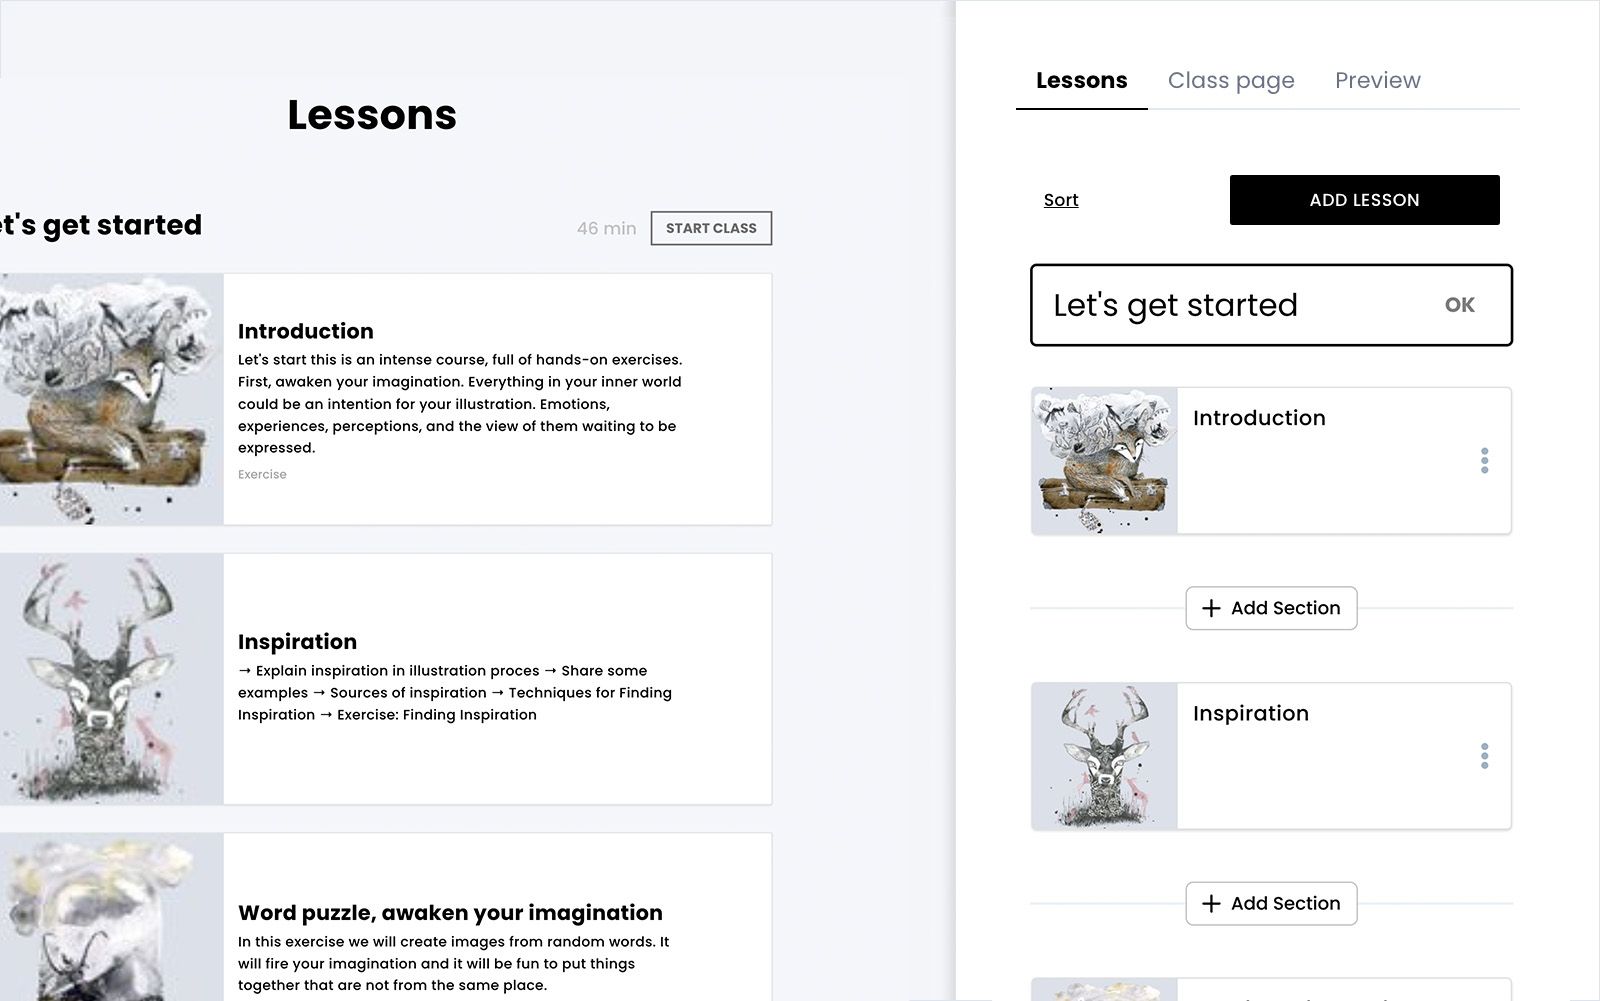
Then, you must launch the Lessons
You'll find the Lessons tab under the class. Select to open the Lessons tab , then click the open button up and start making your own lessons.
What is it? in CreativeMindClass
1. Click LESSONS tab to open it.
You should list the items you're doing to cover
Begin by listing the main topics and the elements you wish to discuss. These could be introductions, presenting your best works, the course outline, your materials and hands-on projects, finishing your work, editing and conclusion. Do not go into details but. What could you cover in 3-10 minute video lessons?
What is it? within CreativeMindClass
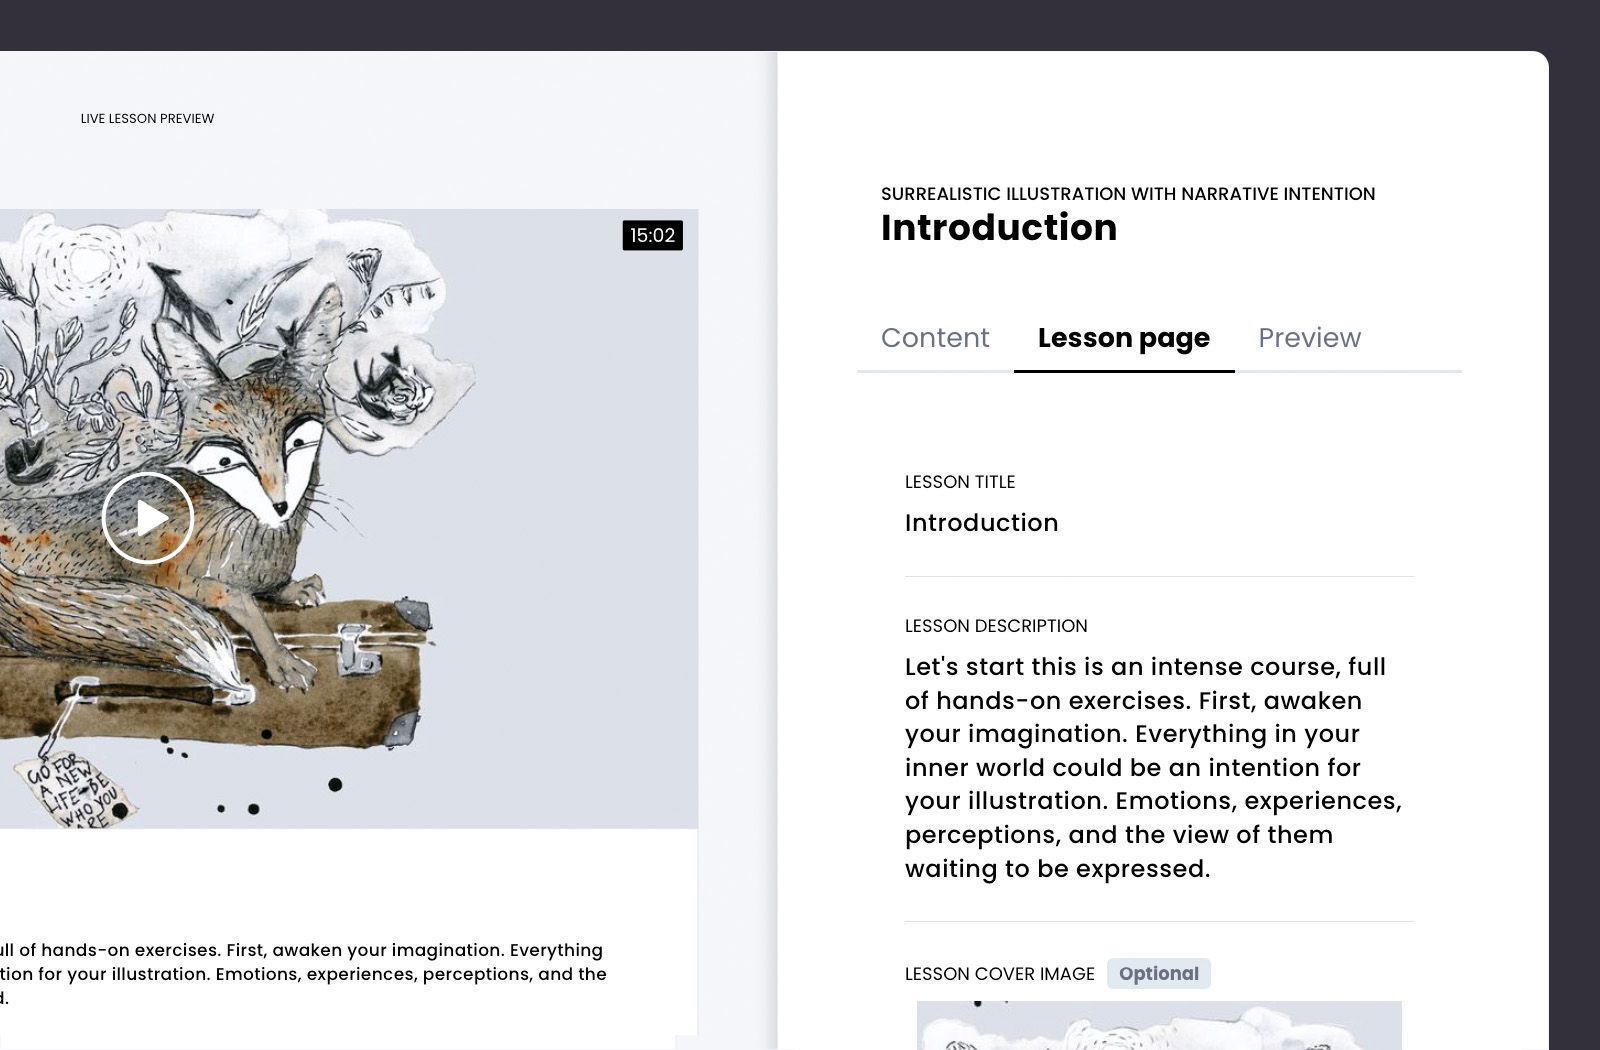
- Click Add LESSON option to start a new lesson.
- In Lesson page tab, type LESSON TITLE. Example: "Introduction".
- Add 10-20 lessons to your program. For example "Materials", "Inspiration", "Class project", "Conclusion"etc.
List the individual learning outcome
It's the core of your course outline. It's where you list all the important points for every lesson you plan to record. Make a list of specific learning objectives and the content that can answer your audience's questions or figure out the gaps not met by competitors.
What is it? in CreativeMindClass
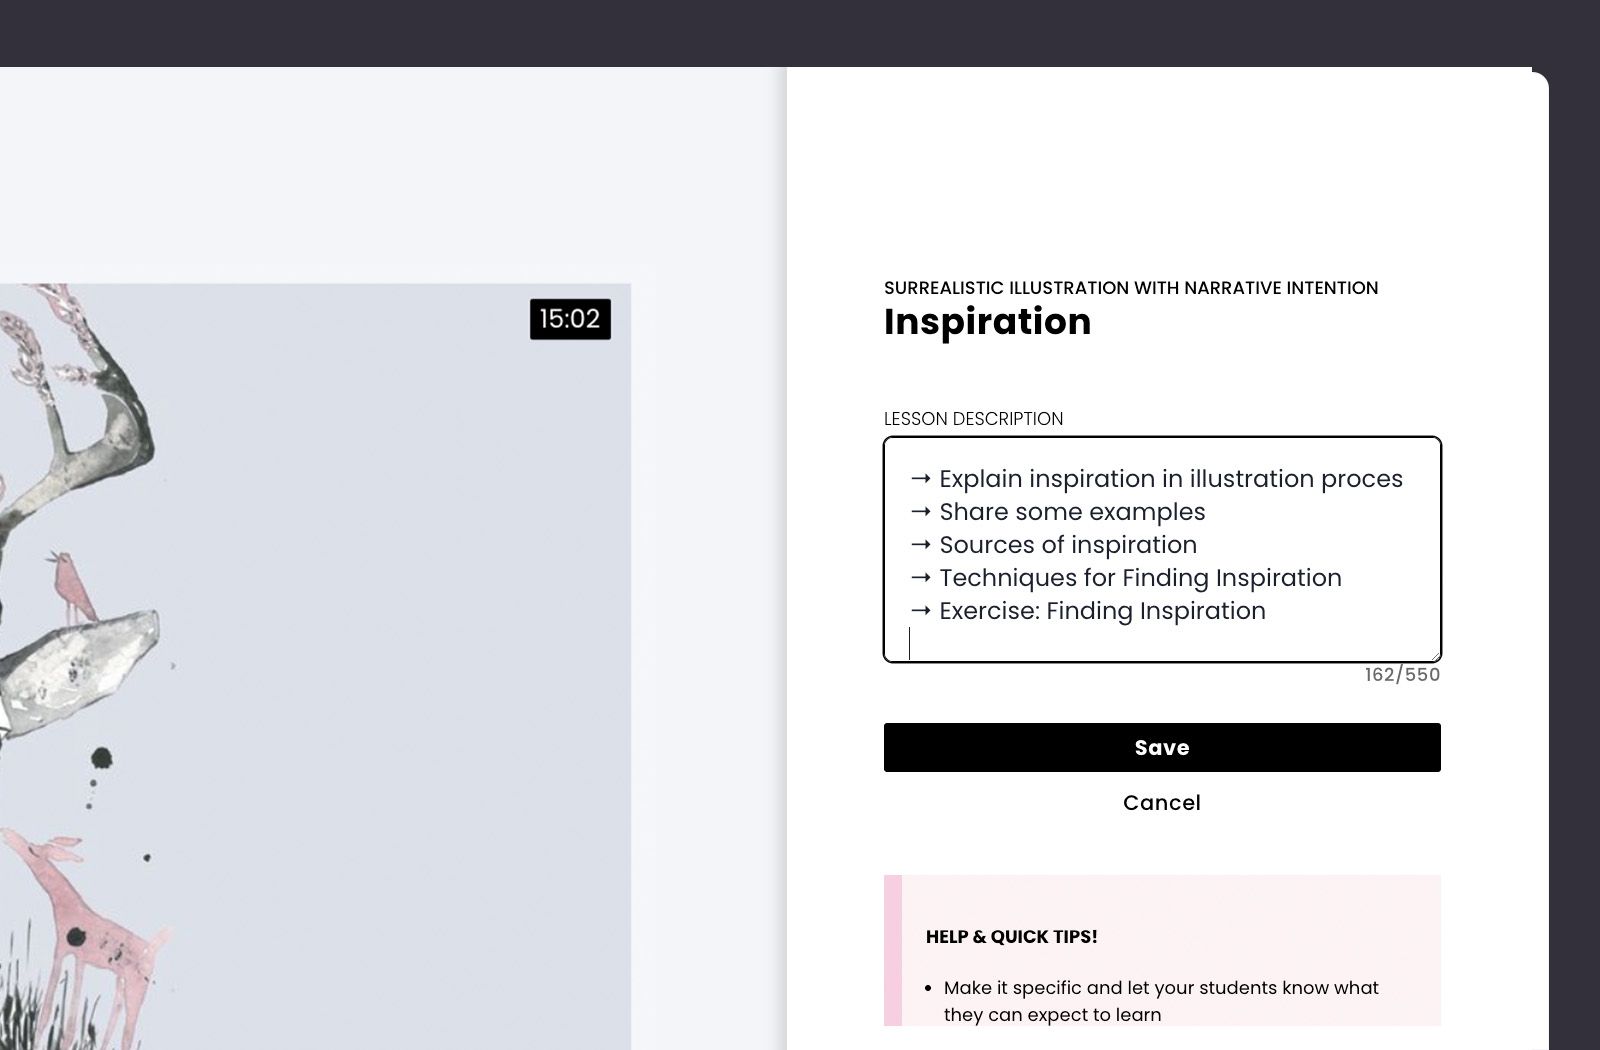
- Browse through the "Inspiration" lesson.
- Type LESSON DESCRIPTION to create your lesson outline. As an example "Explain the inspiration behind your drawing process, discuss some instances, examples of inspiration sources methods for finding inspiration, exercise: finding an inspiration".
Change from chaotic to orderly
You might have created a course outline that you find now is too long or not clear enough. If you have lots of details to go over, think about breaking your course into sections. Take away the lesson that don't have a clearly defined learning goal. Be ruthless at this stage so the lesson doesn't turn into a long-lasting practice.
How do I get it in CreativeMindClass
- Click the Add Sectionbutton to make a new section.
- Type Section title. For example "Let's begin" section for "Introduction" and "Inspiration" lessons.
- Create additional sections for your classes.
Refer to it in the video recording day
In the past, you printed your to-do list to refer to during filming. However, these days the to-do lists can be easily accessed via phones or laptops. So, you are able to make sure that each lesson is completed or alter your schedule as required.
The course is over! outline!
After your course outline is complete, you have a clear plan to record your video.
Next, we'll discuss how to deliver and record your material...
4. Content delivery
Create videos, download files and work outs.
Now that you have a outline of your course in place now is the time to begin thinking about the best way to present every part of your online illustration course.
Videos include engaging, interactive and enjoyable content that provides a fantastic learning experience for students who are online. The most effective method to convey the learning results is to combine different multimedia: videos, screen recordings, presentations, audio, hand-outs, as well as exercises.
Look at your lessons list. Which approach is the most appropriate to convey the objectives for every lesson?
First, open the Lessons
You'll find the Lessons under the class. The Lessons tab is the first to open it and start by adding media to each lesson.
How to do it within CreativeMindClass
1. Click on the LESSONS tab to display it.
Add a video to every lesson
Videos are the most engaging method of presenting your information. Videos can have different types, including presentations, or screen recordings that contain audio. It isn't necessary to stand in front of the camera constantly.
You can make videos using the tools that you have in your hands. When you're done making and editing your video there are a variety of short quality, 16:9 video videos to upload. Be aware of the top quality of your video. Resolution must be at least 1080p.

How to do it in CreativeMindClass
- For LESSON Select in the LESSON, select a VIDEOlesson type.
- Upload a video to your computer.
- Add a video to each lesson.
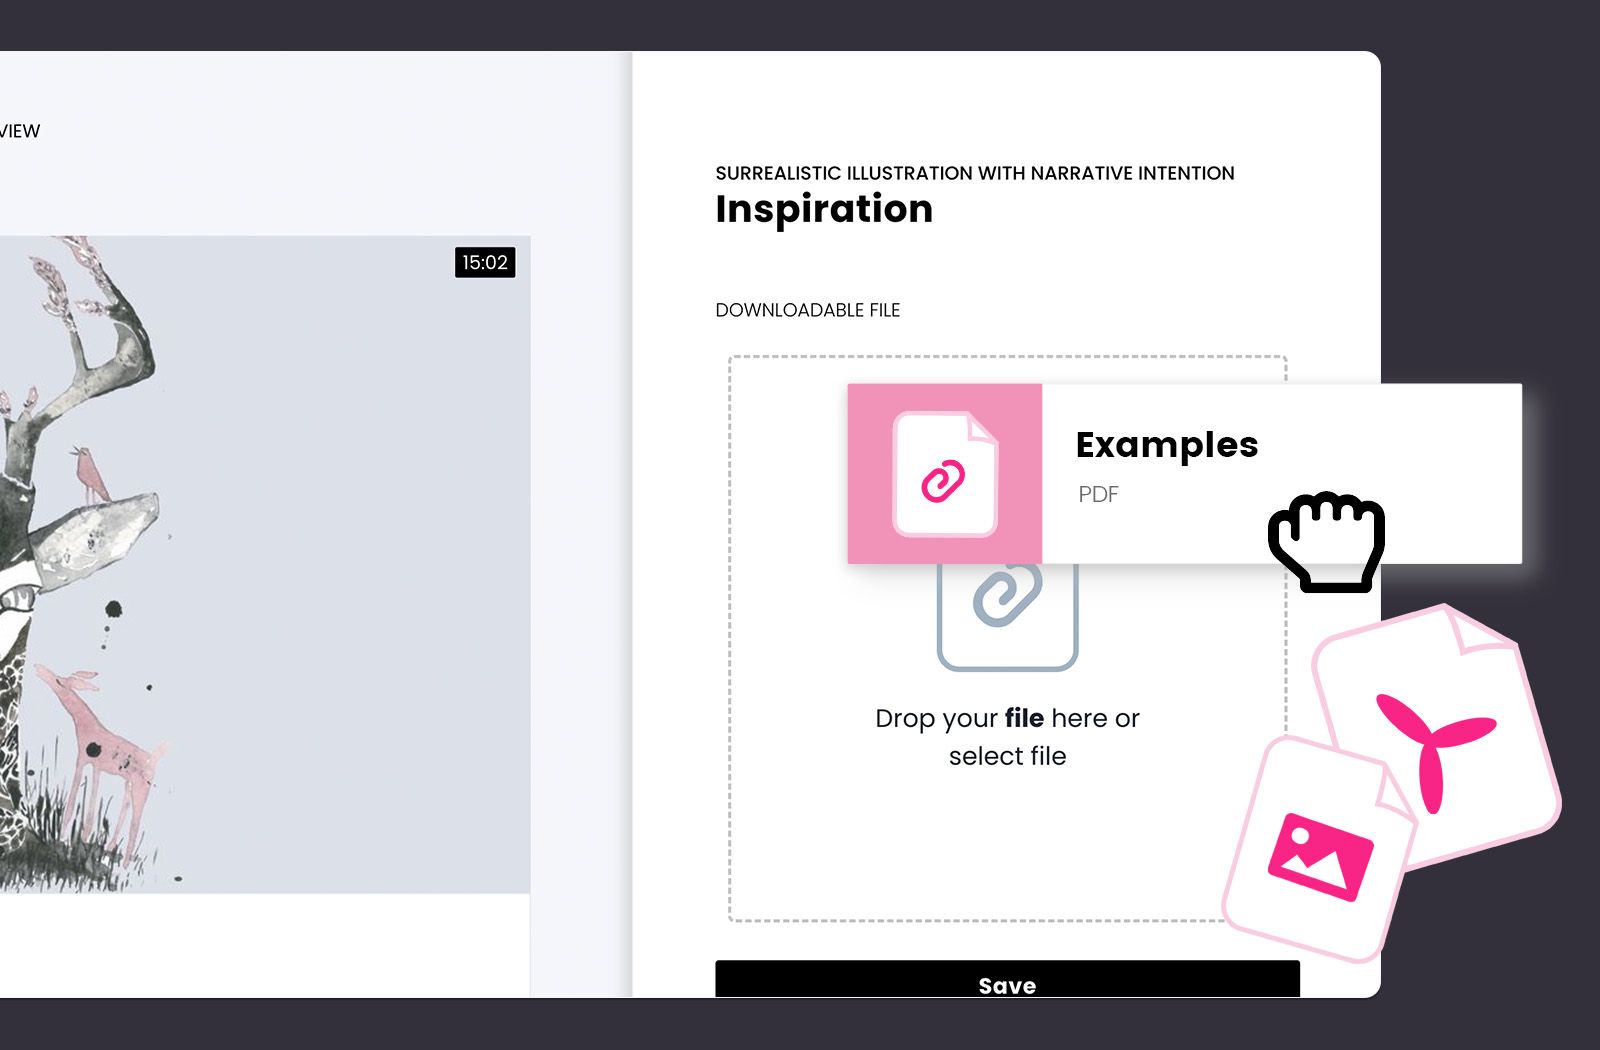
Upload a download file
Downloadable files can be a fantastic way to enhance your lessons. The ability to download files makes your lesson fun, engaging and interactive. They also leave your image on their pulpits and desks. If you add an extra image to your class the students have the option to download the file, print it, fill it in, or edit the file.
You can create video lessons using worksheets, additional documents or native files. Make downloadable documents using programs that includes Procreate Pages/Word Google Slides, Prezi, Photoshop, or Canva. Combining downloadable files with exercises allows students to upload their work into a course and then receive your feedback.
After you've completed your downloadable files, you have high-quality image files , or edited native files you can upload.
How do I get it in CreativeMindClass
- Navigate to the tab titled Content
- Select DOWNLOADABLE FILE to upload the document.
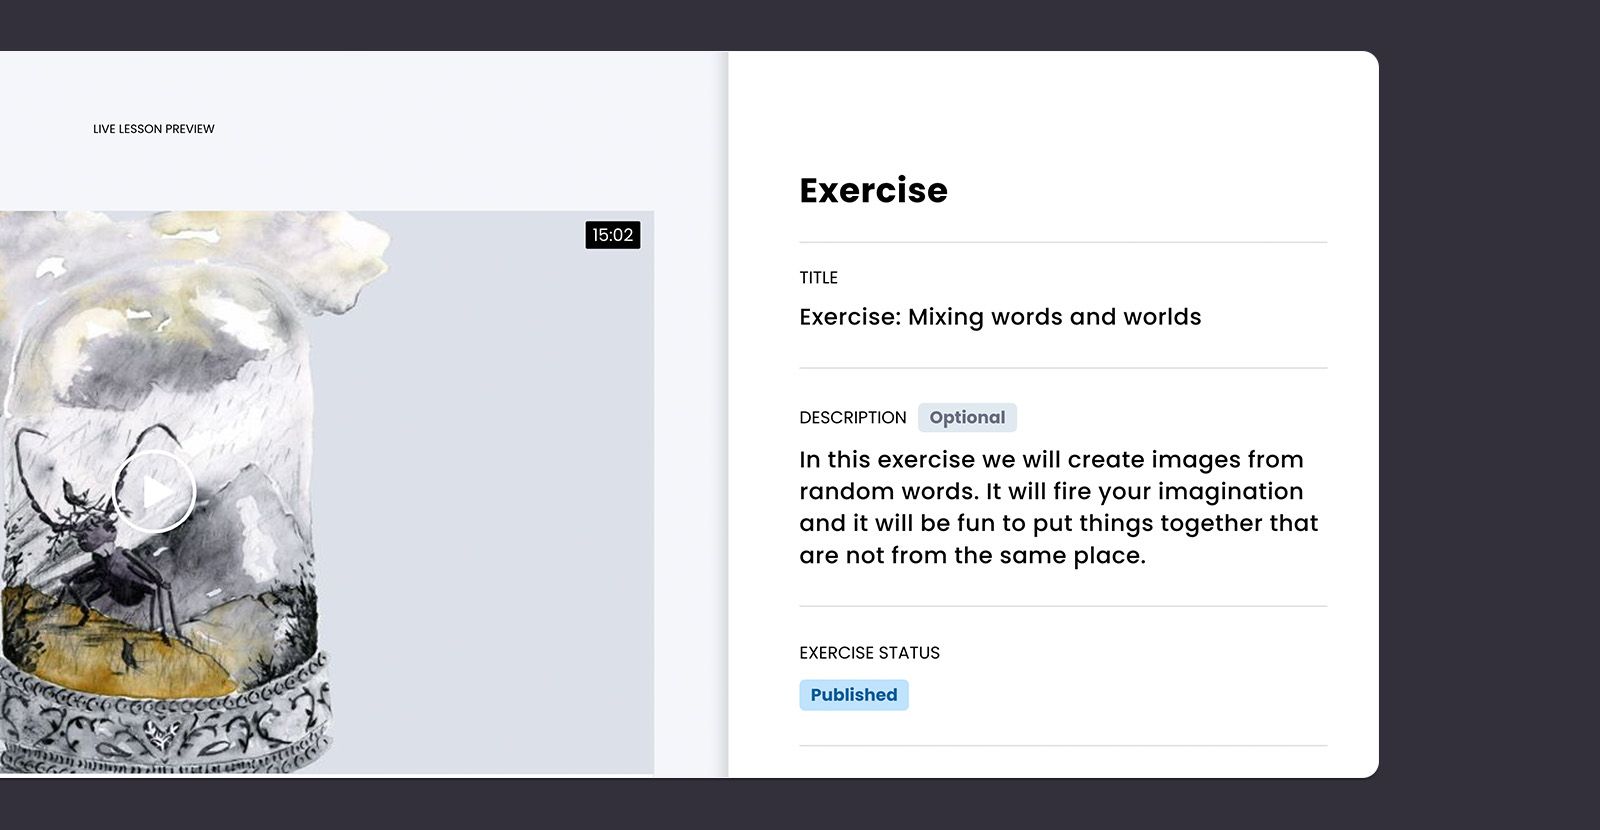
Add an exercise to the lesson
Exercises can be a powerful method of delivering learning outcomes. They engage students to learn through doing. Such active learning typically consists of a task that can be completed and instructor feedback.
Think about the learning experience you'll create to help students achieve their goals. Look at your Lessons list. Which lessons could have interesting and engaging activities to help students learn? What lessons might have homework tasks? What brainstorming activities could you include? What's the end-of-course project in your course?
How do I get it in CreativeMindClass
- Go to the tab for Content of the lesson
- Click EXERCISE to design exercises for your students.
Students are asked to submit their work and ask for comments
The online illustration course will ask for a classroom or lesson project. In the event that you incorporate such exercises that your students are able to apply the skills they learn during the class, and then upload them to CreativeMindClass where you can give comments.
How do I get it in CreativeMindClass
- Navigate to the tab for Content of the lesson
- Click EXERCISE to generate an exercise.
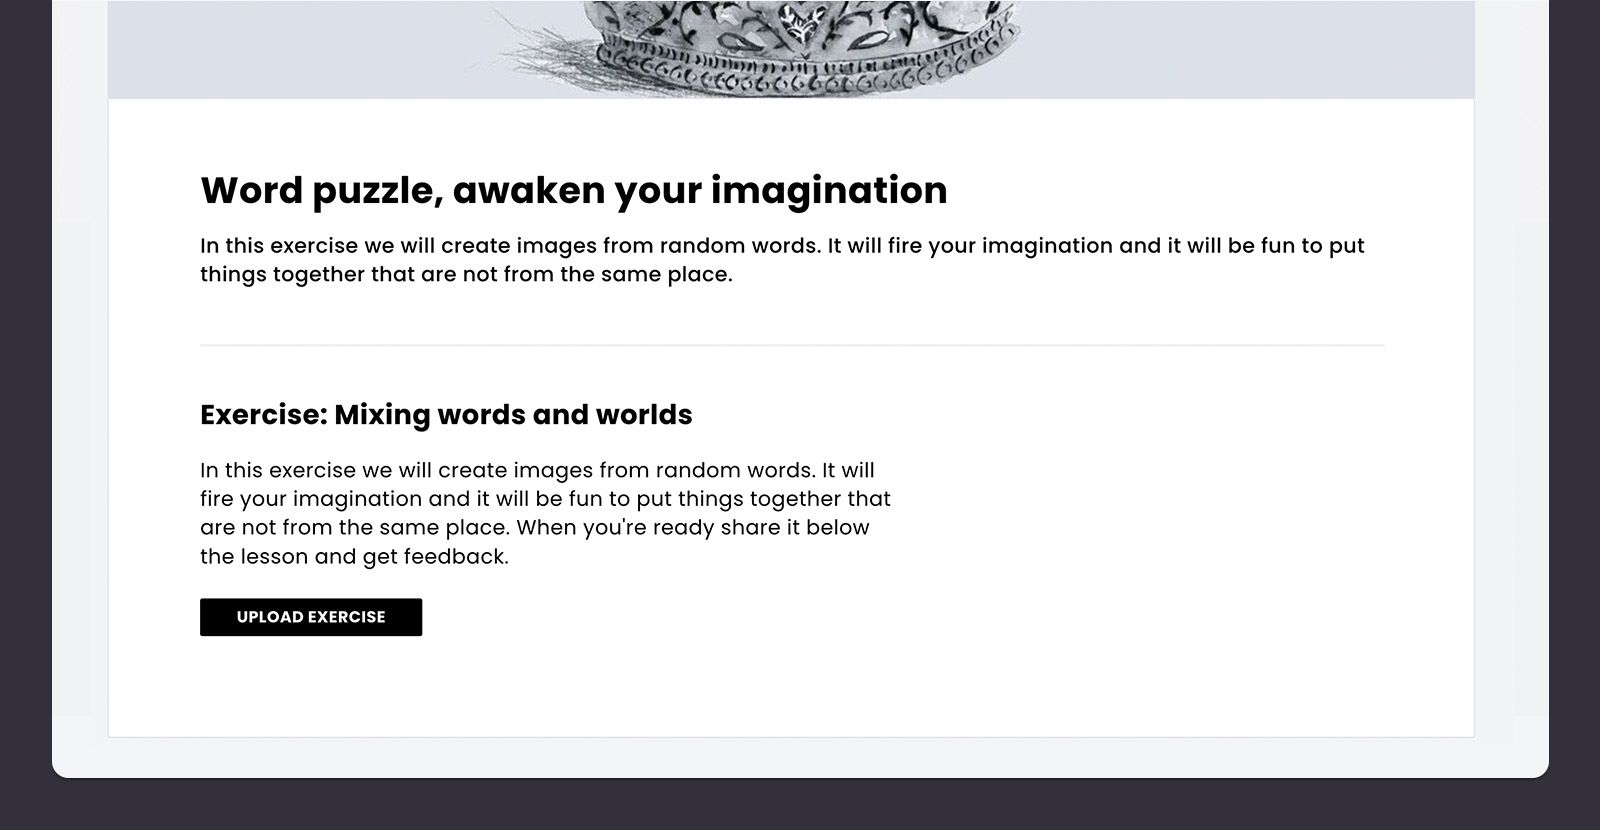
- Type TITLE. Examples "Mixing words and the world".
- Description of the type. Example "In this task, we'll make images using random phrases. It will fire your imagination and be exciting to combine things that are not of the same source. Once you're done, share your ideas in the lessons and get feedback". Upload Exercise
- If your student has uploaded the assignment, go to students' workto give your feedback.
Create an online community around your course
Feedback and activities for learning are the initial steps towards building an engaged community around your online course. You can stop at that or enhance your learners' learning experience to the next level. This helps to expand your company and increase the visibility of your brand.
What can you do to engage your students? What are you posting to social networks? Do you have any tips you can share about gear, composition or even software? A good idea to keep your students entertained and motivated to finish the course are daily posts with inspirations in the final work.
How do I get it within CreativeMindClass
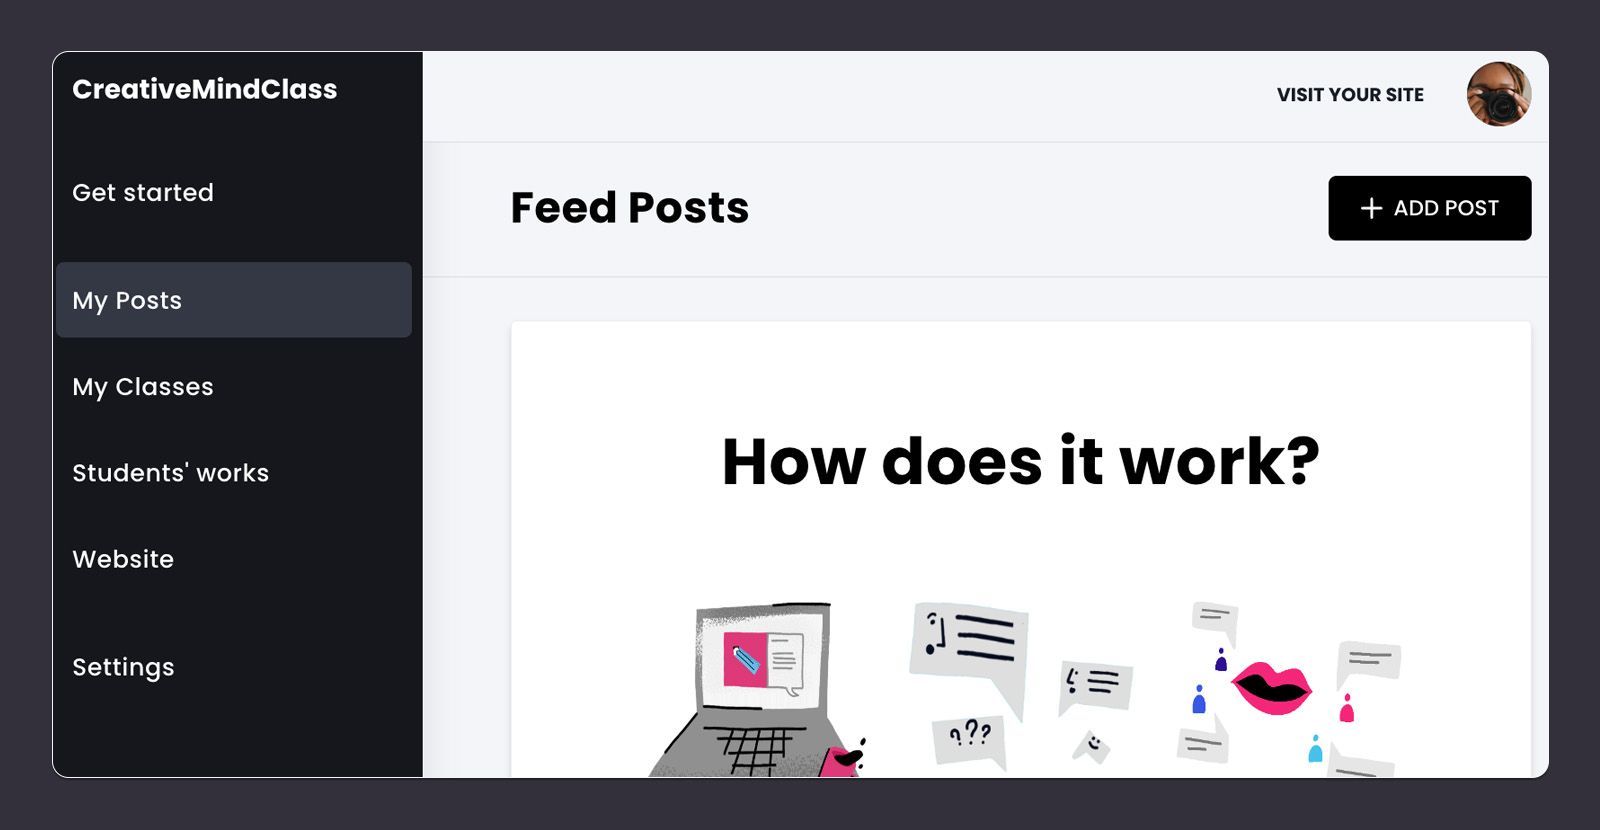
- Select My Postsin the main menu, to launch it.
- Click the ADD POST button to create the new post.
It's time to prepare the contents!
Now that your content is done, you now have a powerful online illustration course. It needs a home.
Next, we'll create copy and upload images to the course's site...
5. Site for Course
Make your readers buy with text and visuals.
You've recorded your video, and you're sure you've made some amazing lessons. It's time to package and sell your video lessons. The easiest way to do is by creating a website (sometimes called a sales page or an e-commerce site).
A website that is clear and focuses on benefits will help make the course more attractive to prospective students. What makes someone pick your course over another? It's all about what you can offer to your client. Pages that convert well typically have attention-grabbing copy and visuals representing the main benefits closed with a clear call-to-action.
First, open the Web site
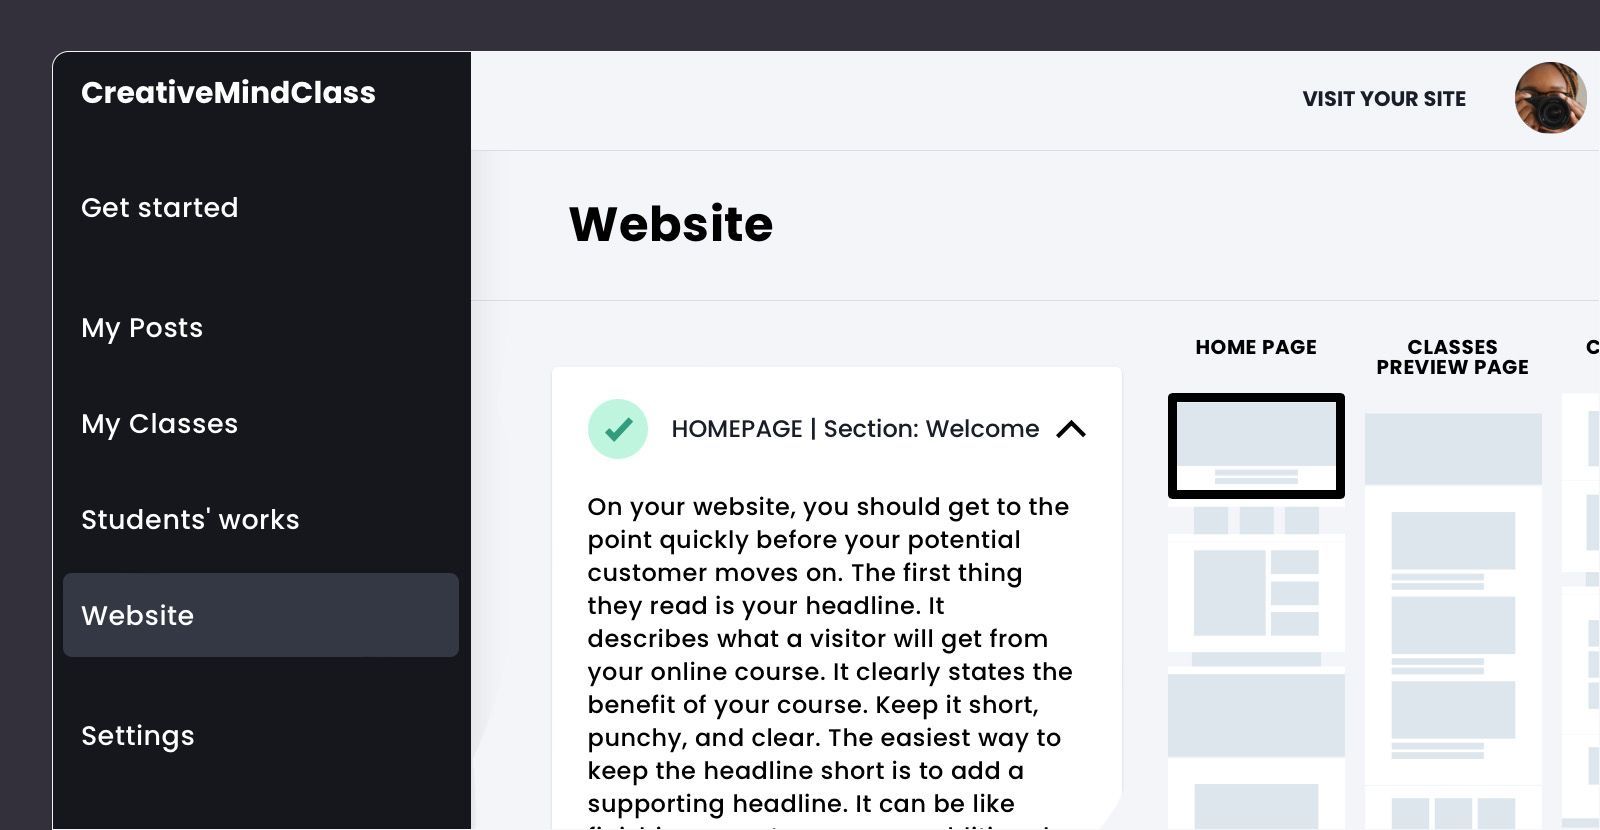
Click on the Website to load it, and to include your headline, images as well as copy.
How do I get it in CreativeMindClass
- Click Websitein the main menu in order to display it.
Get the attention of the viewer
On your website, you should get to the point fast before the potential client goes on to the next page.
The first thing they see is the headline. The headline explains what visitors will get from your online illustrated course. It clearly outlines the benefits of your course.
Be sure to keep it brief, punchy and concise. The easiest way to make sure the headline is shorter is to use an accompanying headline. It can be like the end of a sentence or another sentence that supports the principal statement.
What is it? in CreativeMindClass
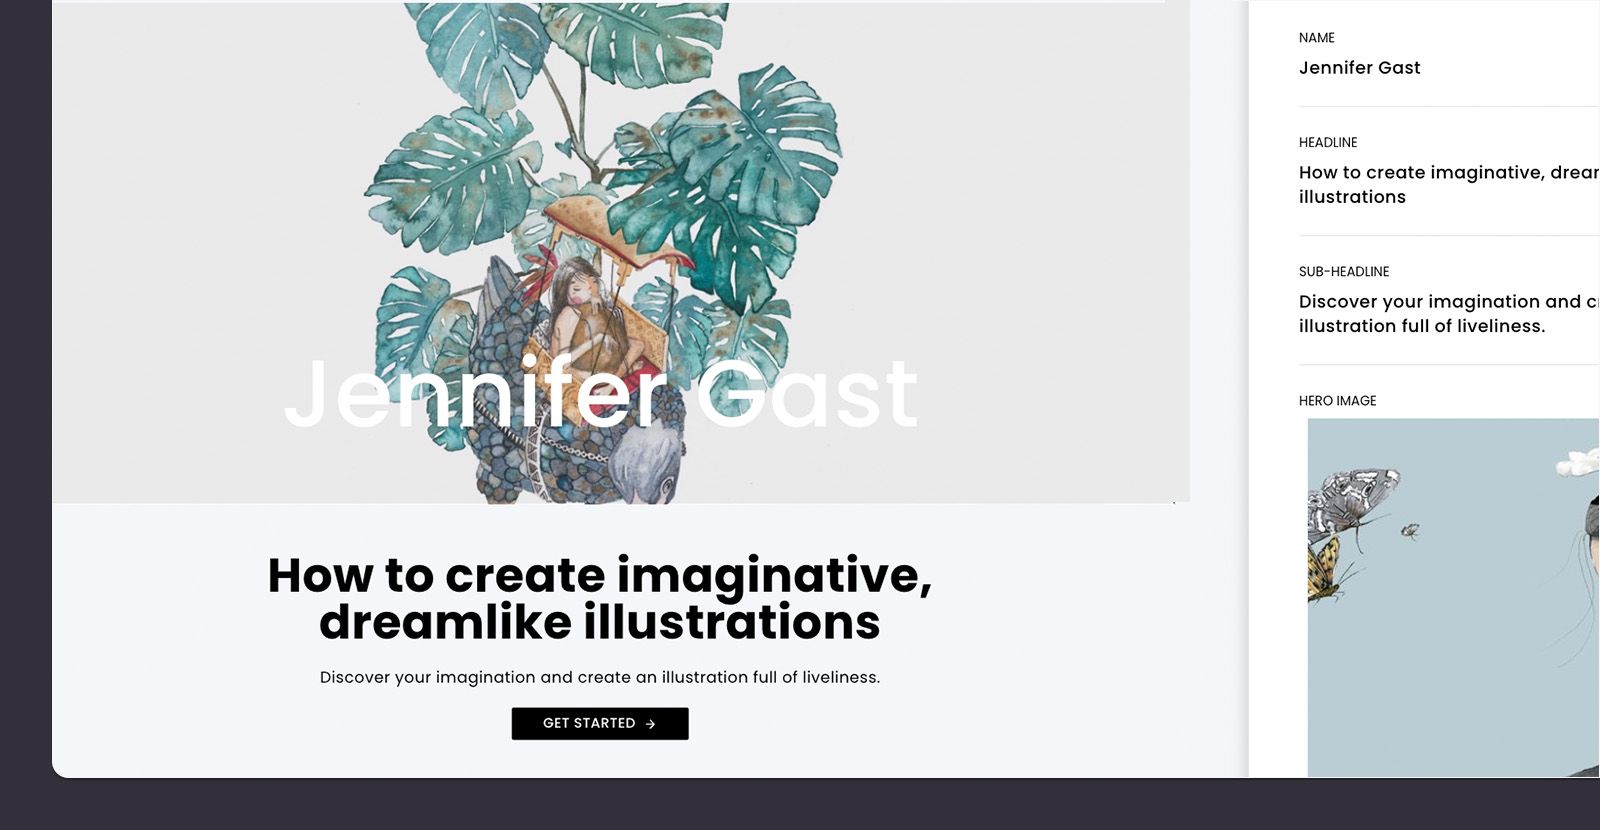
- Click the on Edit button in the the Welcome section.
- Write a Headline. As an example, "How to create imaginative, dreamlike illustrations".
- Use the your SUB-HEADLINE. As an example, "Discover your imagination to create an artwork full of liveliness".
Add inspiring visuals
Include the hero image (or background video) to the top part of the course website so that visitors can understand the content your course offers.
What does the image of the hero says about the advantages of your class? Put students in a scenario to show what they can anticipate from your class. If you've prepared a course that focuses on creating book illustrations, you can make collages or even a background video of the illustration. The visuals should be large sharp, clear, and of high quality.
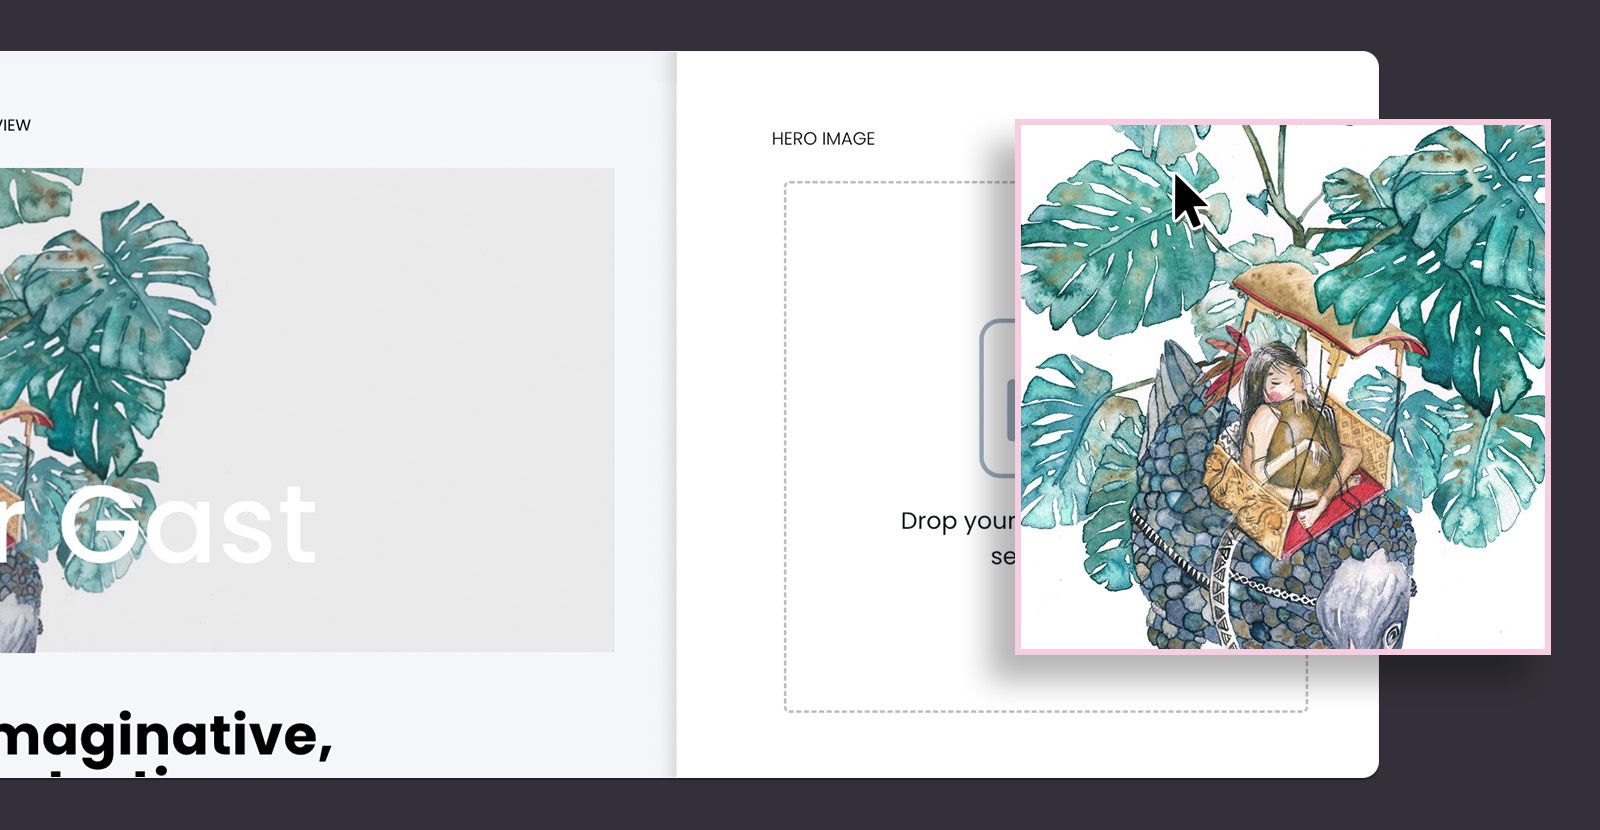
What is it? in CreativeMindClass
- Click the on Edit button on the Welcome section.
- Click HERO image, BACKGROUND VIDEO or Animationto add your visuals.
Introduction to your course
Provide some basic information about the course you are illustrating.
What is it? How long is it? What number of lessons do you give? Are you able to give bonus material? What's the project for the class? Who will the class be for?
This information helps the visitors who skim through your page quickly understand the products they're purchasing.
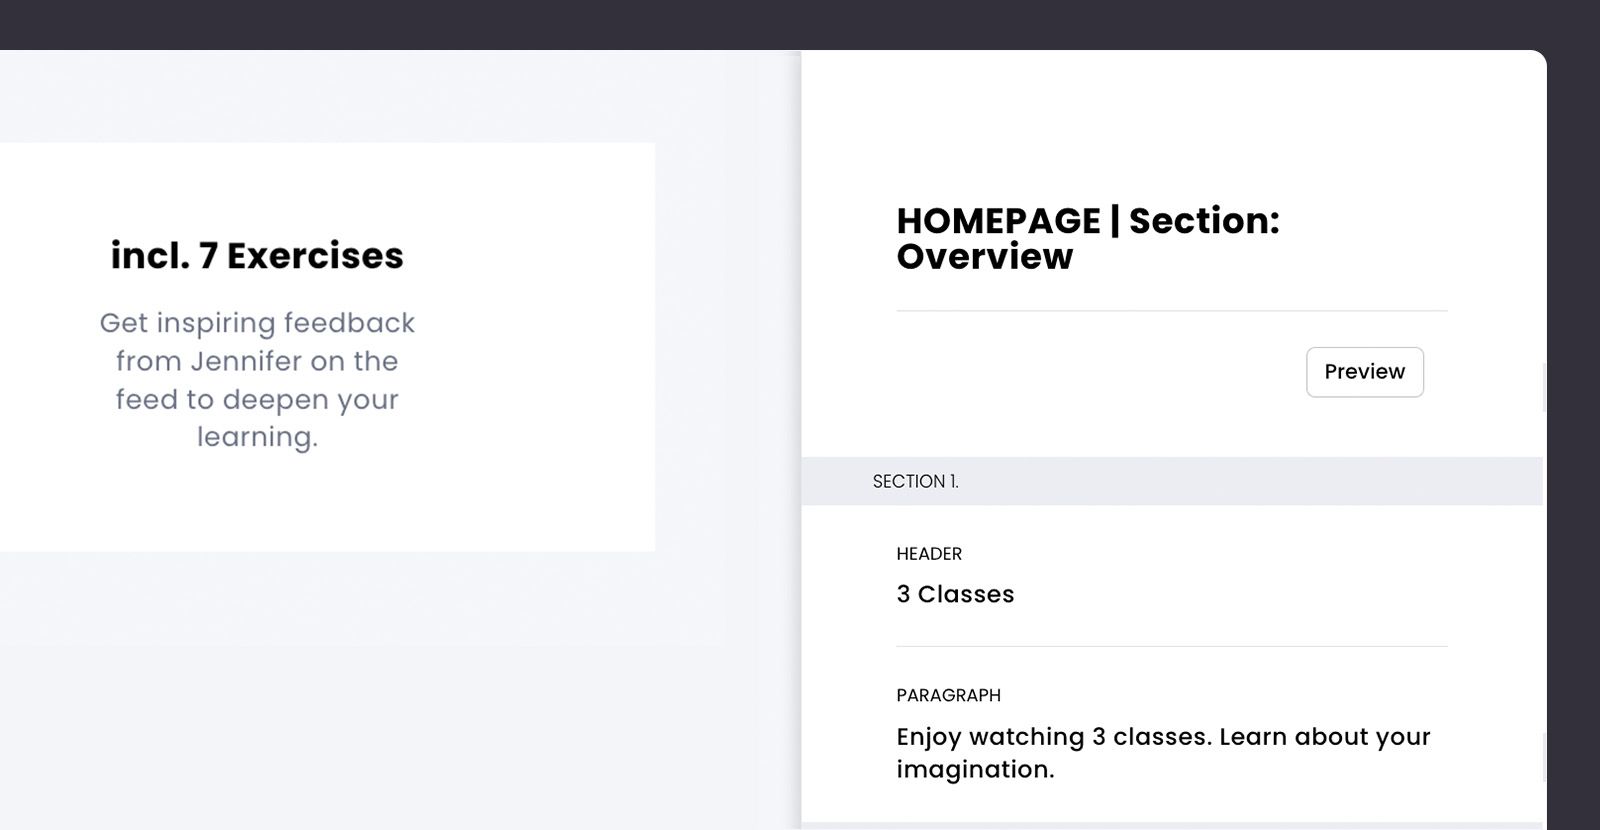
How to do it in CreativeMindClass
- Click the Edit button in the the Overview section.
- Type HEADER. As an example, "3 Classes".
- Write a PARAGRAPH. For example "Enjoy watching 3 classes. Learn about your imagination ".
Highlight benefits
Clear benefits convince individuals. Include more information on your program, the results of the course, as well as its worth.
What skills will they learn? How would the course benefit the student? What are the changes they undergo? How do you tackle the problems?
The easiest way to highlight the benefits of a product is to compose a short, punchy, and clear header. After that, you can add a sub-header to support the main claim. In the paragraphs, write shortly about the key learning outcomes, and describe simply the benefit you're offering.
An effective way to emphasize the advantages is by using pictures or illustrations that catch the eye.
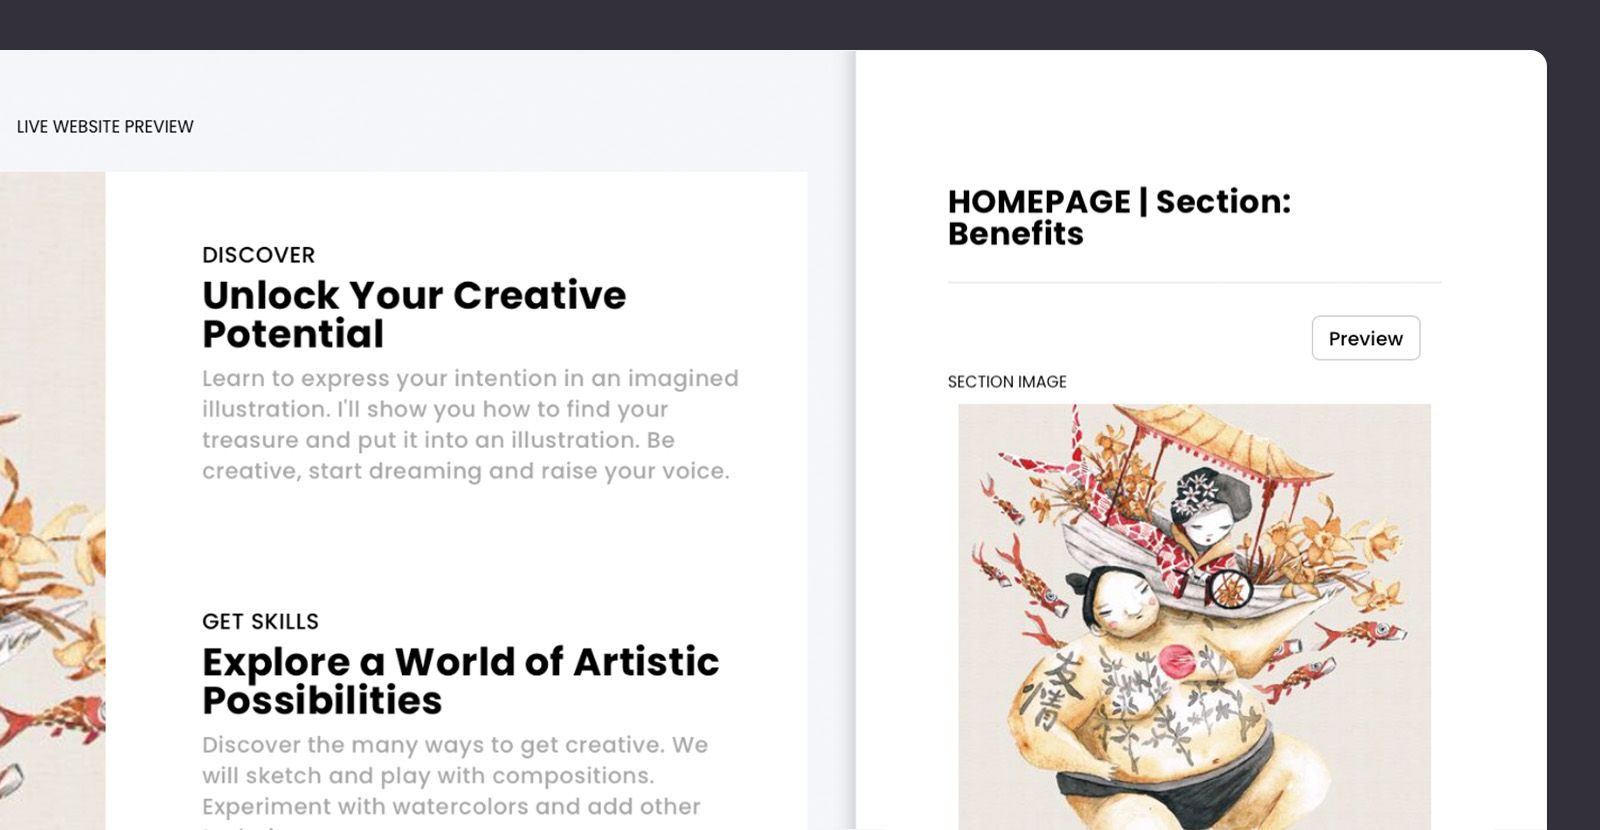
How do I get it in CreativeMindClass
- Click the to edit button located in Benefits section.
- Type Header. Example: "Unlock the creative side of you".
- Type Sub-Header. Example: "Discover".
- Enter a PARAGRAPH. For example "Learn how to communicate your goal in an imagined illustration. We'll help you locate your hidden treasure and then put it in an illustration. Be creative, start dreaming and raise your voice ".
- Click SECTION IMAGEand upload your image. TIP: Make sure you focus on three main advantages. Keep the copy concise and clear to attract readers' attention. Circle back to remove anything which is difficult to follow.
Give a "try before buying"
Anyone who's browsing the course's page would like to see an inside look at what's in the. It's exciting and gives potential learners a glimpse of what they can expect of a particular course. It can help them decide which course would be an appropriate fit with their preferences and requirements.
So make that with an amazing promo trailer to get attention, draw in more students and increase the sales. For a promo trailer, it is possible to create a stunning and engaging video that lasts between 30 and 60 seconds.
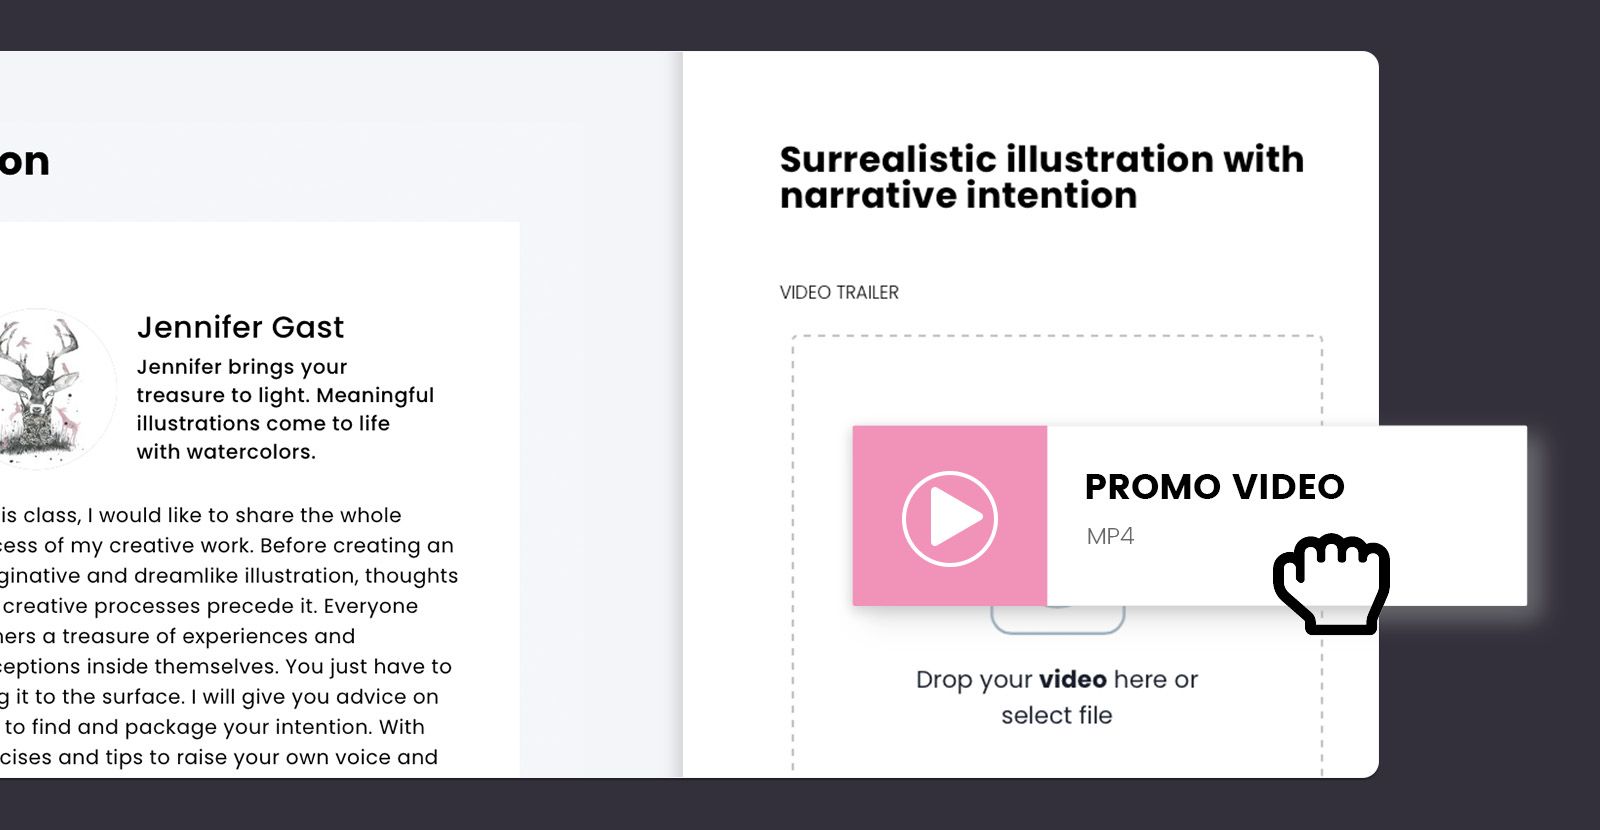
What is it? within CreativeMindClass
- Click My Classin main menu to open it.
- In Class, Click on the class page tab to open it.
- Hit VIDEO TRAINERto upload your video for promotion.
Share it with your followers
Congratulations! Once you've prepared your website for your course Your online illustration course design is complete. This is a moment of excitement after all your hard labor.
Another type of work is about to begin! It's time to share it to your target audience. Insert the link to your site or social media account, your emailor blog and begin your promotional campaign. TIP: Before you share the course with your audience, make sure that the class, all activities, and lessons are published.
How do I get it within CreativeMindClass
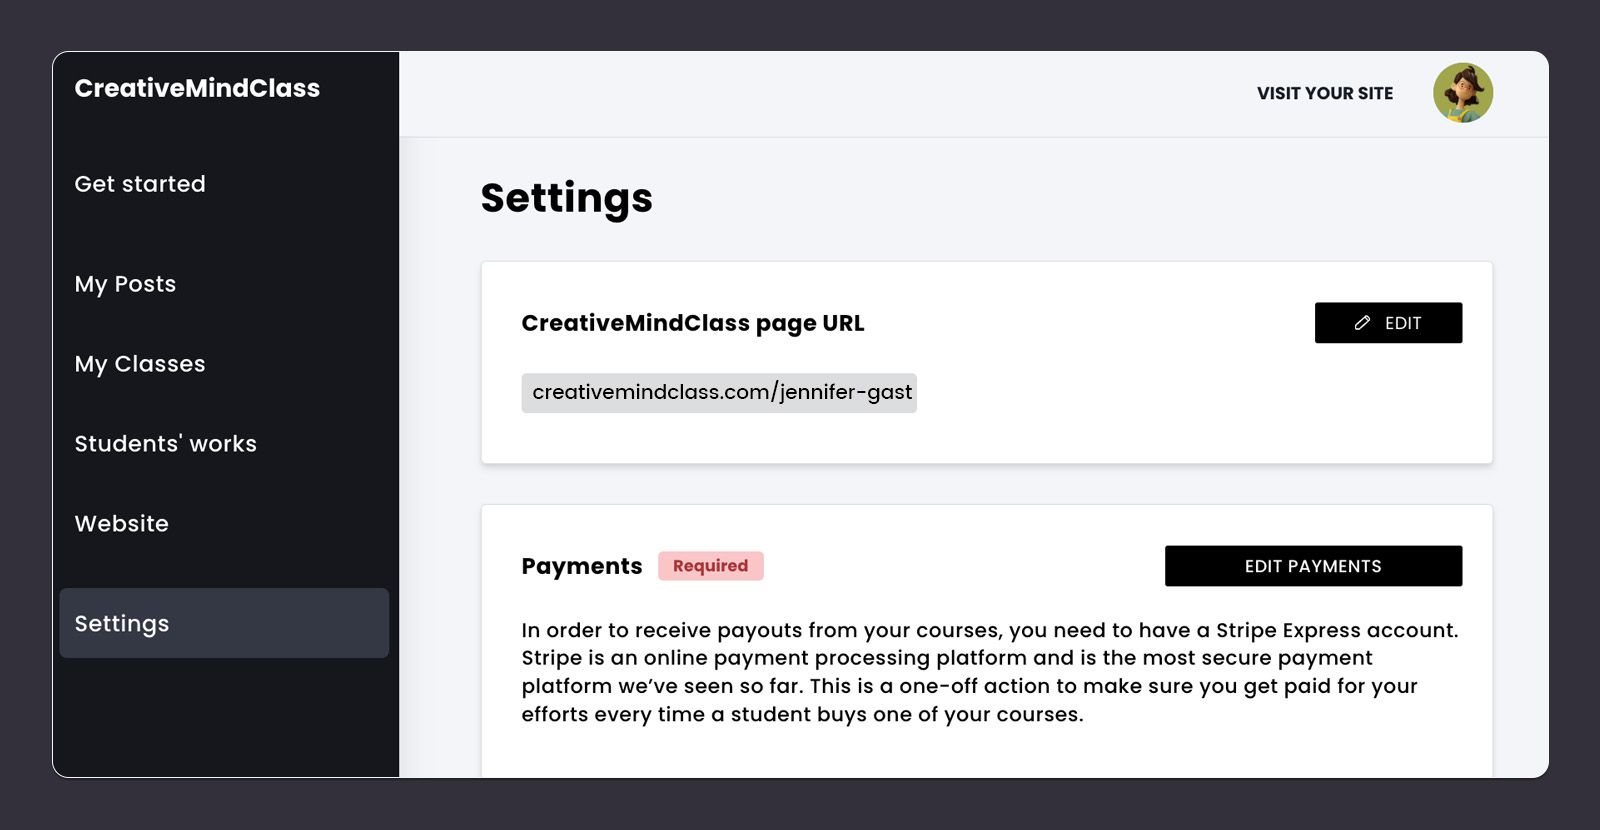
- Select Settingsin the main menu, then click Settings to launch it.
- Copy CreativeMindClass page URL.
- Share the course with the audience.
You're all done!
I hope this article will help you get organized and also gave you room to make an enjoyable learning environment for your pupils.
If you are starting a new online illustration course, use the Illustration Course Template below to set it up in a matter of minutes.
Create your online illustration course. Today.
Begin your journey for nothing by using our template.
- Start creating your illustration course
Sign up for free with no limitations on time SHARE The link was copied!
It is also possible to like

How do online courses work and why you should Care?
![Best Platforms to Create and Sell Online Courses [Updated 2023]](https://taxfork.com/content/images/2023/04/online-course-platforms-1.jpg)
The best platform to create and sell Online Courses [Updated 2023the year 2023

The Mini-Course is the Best Way to Start with Online Courses

How to Create an Online course

An Introduction to selling online courses
Teaching with video exercise, feedback and exercises in a separate platform Get started today and create inspirational classes online and to sell your products globally Create your own course -- it's free No credit card required
CreativeMindClass is an ever-growing network of teachers, creators as well as students, who connect on the learning platform to create, teach, learn to connect, and incite.
Teaching Platform
Magazine
- [email protected]
- Help Center
- Plans & Pricing
- Version Notes CreativeMindClass Blog CreativeMindClass Blog (c) 2023. All rights reserved.
This post was posted on here